Showing posts with label craft guide. Show all posts

Sunday, December 17, 2017

How to: decorate indoor pot plants with old bonbon cases

A little brainwave I had today and thought others would appreciate. With the festive day approaching, consider saving used bonbon cases to decorate your small indoor plant pots next year. A home potted up plant decorated with bonbon cases would also make a nice gift 🎁

Peel apart and break apart the case into three sections. You only need two sections to complete a pot wrap 

Use the existing paper tab and slot to join two sections together. Alternatively a little sticky tape can be used.

Cut off the zigzag edges. I've used a stainless steel ruler and cutting knife for the neatest result but scissors are fine if you prefer. 

Check height fit on pot and trim back so cardboard won't get wet when watering your plant.

Tape in position tab side first.
Tape end snugly in place.

All done! 

You can coordinate your pots by using the different designs/colour ways from the same box of bonbons. 

πŸŽ„✨Merry Christmas!✨πŸŽ„


Saturday, March 19, 2016

DIY Plant Markers


Icy pole and icecream sticks should always be saved because they are useful.  They can be used to stir a small pot of paint, to mix and apply two part expoxy resin aka Araldite, and with a pencil or waterproof pen/biro...


...they make biodegradable plant markers.


Wednesday, May 14, 2014

How to make a vine wreath in 6 steps.

 photo decorated_zps262b1da0.jpg
Wreath made of wisteria vine prunings, decorated for Christmas.

This is so easy - you don't need to be an expert florist or craftsperson to get a good result. It's a great way to utilise waste from your garden, so it's also free! I enjoy making them so much I've been making one every year since moving to this house. I will have to start giving them away. They could make a sweet gift for a loved one.

Depending on how you decorate this wreath you can use it for all sorts of occasions or as a year round piece of decor. You can also use the same technique on grapevine. That is what the commercially sold natural wreathes are made of. The advantage of the wisteria prunings is that the vines are more supple and won't snap like the grapevine does. I have successfully used a similar technique with young bamboo with the leaves on but the edges of the the leaves are like tiny serrated knives. Wear long sleeves if you go down that path.

You will need a round bucket to dry the wreath on. Preferably it has no moulded in spout - this may lead to a less round wreath - and a good slope to the sides for easy putting on and removal of your wreath.


 photo vines_zps2013b8cb.jpg
1. Strip vines of leaves. If you are using grapevines you can leave the tendrils on. They add interesting texture and make the wreath fuller.

 photo vinewrap1_zps8727a886.jpg
 photo vinewrapDETAIL_zpsfdd34b91.jpg
2. Starting with the thickest end, wrap a vine over itself into a circle of the size wreath you want. Pay attention to how the vine allows itself to be bent and don't push it in ways it won't yield.

 photo vinewrap2_zps6a653611.jpg
3. Keep on adding more vine lengths - preferably in one direction only but it isn't the end of the world if you don't...

 photo vinewrap3_zps7dc55d3b.jpg
4. ...Until you have used up your prunings.

 photo vinewrap_zps4cfb05f3.gif

 photo bucket2wreathes_zpsc1dc5586.jpg
5. Push over upturned bucket until it fits snugly. This will ensure a perfect, round shape. As you can see it is possible to dry more than one wreath at a time. Leave to dry.

6.It's ready for another wrapping session when it the vines have shrunk back and are no longer green. It takes 3 to 4 sessions of pruning and wrapping to get a sturdy, solid feeling wreath. It can not be done in one session because of the shrinkage. It loosens as it dries and you need fresh material to tighten it up.

 photo oldnew_zps450f74c9.jpg
Dried and fresh wreathes.

 photo WreathGrapevine_zps3331007a.jpg
Grapevine wreath


Thursday, November 05, 2009

How to make a fascinator: Part 2

Due to the unending popularity, and recent 'emulation'*, of my How to Make a Fascinator post** the fun will now continue!

Here are new instructions and tips from creating my sister's wedding fascinator, with step by step photographs to make it easier for you to make your own. If this is your first time here, and you're planning to make a fascinator, please take the time to read the original post because much of what I had to say still applies.

[edit 20/11/09]
Photobucket
My sister and her new hubby on their big day. Just lovely and they're so cute together :)
Photo by Nic Daws.
[/edit]


Materials
Following the praise received for my first fascinator, I volunteered my new found millinery skills to my sister for her wedding. She independently went to Spotlight and bought approximately $20 worth of materials;
two feather flowers,
hair slide combs, and
a pick of short emu feathers.
We discussed what she wanted - nothing too big or showy - soft and pretty. She had a pinky red and black theme for her wedding though her dress was a traditional white.

Photobucket
In addition to the materials my sister brought over I used
a foam disk (a soft and flexible projectile from a children's toy),
some scrap red satin,
organza (sheer) ribbon,
additional emu feathers,
craft glue, and
polyester thread.
She did not buy a base so this presented an opportunity to make one from scratch. The foam disk could be cut from a sheet of what is commonly known as craft foam, available at art and craft shops. Whatever you use to create a base, it needs to have a combination of rigidity so that it holds its shape while still being flexible to curve around the head when being put on. For this project the base is relatively small making this fascinator more of a big hair accessory rather than a hat substitute.


Making the base
Photobucket
1. The ironed, circular piece of satin was stretched over the foam disk. A pin helped keep it in place during the stitching process.

Photobucket
2. The reverse of the disk.
As you can see the stitching and stretching needs to be even and neat. Fortunately the foam is very easy to work with and sew through. I used the stitches to put a curve into the disk matching the curve of the slide comb. I gently brought opposite sides of the fabric together. Then I brought in the corners, squashed them down and stiched them to lie flat.

The pick of emu feathers was seperated into three even picks which were bound together with craft glue and thread. After rolling the ends between my thumb and fore finger with some glue, I wrapped the thread around the ends and put a little more glue.

An interesting and useful thing about emu feathers is that they come in pairs. Don't seperate these pairs. It will probably make them harder to sewn on.

Photobucket
Photobucket
3. The base was then double thread sewn to the comb.
Use a double thread for all construction sewing to minimise handling and maximise hold.

Something very useful I figured out all too late in the process is:
Slip a rubber band around the comb to stop your sewing thread from getting caught on the teeth.


Construction
Photobucket
The dimple of the base provided a cradle for the flowers' stems. They, and all other components were sewn on.
Make it attractive from from all angles.
The feather flowers are the star of the show. Their placement allows this fascinator to be worn on either side of the head. To achieve this flexibility of wearing it needed to be attractive from all angles. While this is always a concern with millinery, it is particularly important if the piece can be worn more than one way.


Photobucket
After virtually completing it I decided it needed 3 or 4 longer feathers. I hand coloured 4 emu feathers I had*** using Copic markers to match the bought feathers. Once dry the ink from these markers is more or less waterproof**** I did check out the central city store of Lincraft for an extra pick of emu feathers but much of what I sought looked like it had been trampled in a stampede or possibly plucked from roadkill. This was the week before Melbourne Cup Day. I wasn't going to pay $8 for a pick of 5 feathers with one looking FUBAR.
Be fussy about your materials.
Take your time choosing them.
Get your money's worth.
Get in early or go suburban to get the best.


Photobucket
The organza fans (see original post) add contrast, conceal the base and the feather quill ends. Each fan is made of about 5.5" of ribbon. The emu feather picks add volume from all angles.

Photobucket
This piece was about about one and half to two hours work.


*One case of the P word. Please just let me know if you would like to republish any part of my posts/blog and give credit where credit is due. I'm very happy to share - I don't make any money out of this - but I'd like some credit for it.
**Now 2 years old and still responsible for about 90% of my traffic, and about 99% during the Spring racing period.
***From my collection of exotic feathers accumulated from childhood visits to the zoo. Yes I'm a hoarder but I'm organised and it pays!
****Disclaimer: Depending on what the substrate is. I have used it on fabric to retouch colour, and subsequently laundered it without issues. It takes a few washes to get it out of your skin/fingers. I can't vouch for feathers but I am assuming they will be no worse than store bought coloured feathers...

Wednesday, February 11, 2009

Customise a mask - How I did it.

Listening to: Poker Face by Lady Gaga

Photobucket

I started with a well shaped foundation mask from the discount basket (was about $10) at Eloquence Homewares. This one is papier-mΓ’chΓ© which lends itself well to repainting.

Why did I want to change a pretty mask like this one? In a nutshell I felt it needed gothing/steampunking up. It was the wrong colour - a very bright yellow base, sparkling rainbow film glitter, with a pale pink plastic diamante. I needed it to complement this choker I had made for the Euchronia Ball.

Using a stiff bristle brush - a mini stencilling brush I think - I dry brushed black acrylic paint over the painted and glittery areas to dirty and age them. I topped up some of the plain gold, scrolled, glitter design that had gotten a bit muddled by my dry brushing.

Photobucket
I pulled off the diamante and the smaller, grey dappled feathers. Using copper enamel hobby paint and a 000 taklon brush, I carefully painted around the glitter scroll design and over all of the yellow, stippling to blend into the silver area. This type of enamel paint is easy to work with, quick to dry and inexpensive for the coverage you get.

I painted the back and front edge around the trim with black acrylic paint. This was sealed with a mixture of pearlescent acrylic medium and PVA glue for durability ... and to prevent my nose tip from possibly getting black while wearing the mask! This paint was also used to tidy up around the feathers to hide the residual glue from the removed decorations

The synthetic lace was sewn onto the existing woven trim using a small, curved needle. Before committing to such a time consuming exercise I tested out how this would look by pinning it in place. It was not cut to length but sewn on then trimmed off to ensure I couldn't run out. A few more stitches finished the lace end. If I were to do it again I would start from the middle at the forehead rather than the tip of the mask since the symmetry would be that tiny bit better.

Photobucket

Photobucket
Here is a large, metal, filigree cap bead and a small Czech crystal (the same type and size used on the matching choker).

Photobucket
I gently opened up and slightly flattened the cap bead. I stuck the crystal in the centre using contact adhesive. More contact adhesive was used to stick the two to the mask over where the pink diamante had been. Assembled it looks like both a flower, and a gear with a ruby movement.

I didn't want to stick an actual gear on it, since that would be too obvious and a bit silly! It would also be a somewhat clunky - I did try out a few different watch gears. Stylewise a gear was not in keeping with such a feminine mask, and it would limit it to steampunk outings only.

Photobucket
Finished! Almost...

Photobucket
Knowing I wouldn't want to hold this beauty to my face the entire evening, I added a loop of ribbon big enough to easily take my hand while holding the mask. It's sewn in place and the bow is sewn to ensure it stays.

Photobucket
Thus I was able to gracefully hold it in my hand while wearing the mask and dangle it from my wrist while sipping a cocktail.

Photobucket
Voila!

Photobucket
After the event it made a nice addition to my decor. I tied a little loop of gold thread at the end of the stick near the mask and hung it off a pin.

I hope that was inspiring. I love customising things :)

Monday, December 01, 2008

Which came first?

If you think about it from an evolutionary sense I think the egg did but the thing that laid it wasn't a chook.

Photobucket
Check out this wonderful, transforming egg and chick knitting project from Mochimochi

Websites of the Day
... Mochimochi Blog.
Found via another blog which is also worth checking out if you love hand crafted, interesting, funky, quirky plushies:
Plush You

Tuesday, December 18, 2007

How to make a fascinator

Making my own fascinator is something I have wanted to do since they became fashionable attire during the Spring Racing Carnival. I've never actually attended the races, but I enjoy the millinery. Before that I always thought that dainty little black veils and dark lipstick looked especially glamorous.

So last month I combined the two and made my own fascinator.
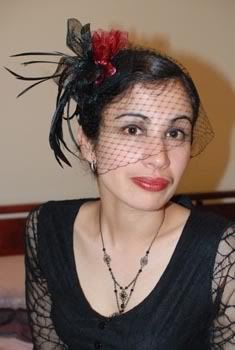
fascintor1107


I was well chuffed with the final result and received many compliments - especially when I mentioned that I'd made it myself. The veil is delicate enough not to hamper vision though if driving I would fold it up just in case.


Materials and how to choose them

Making a stunning fascinator is very much about strong composition. For some of us this comes naturally, others may find it hard to make it come together. Even if you have an artistic eye, for your first attempt I highly recommend doing a bit of research first. Some of the materials are fragile and don't take to reworking kindly.

I bought most of mine from Lincraft in October when they became seasonally available. When I decided to buy my materials, the cheaper round base with sewn on slide comb was not available. I had to opt for the more expensive base and separate slide comb, which I sewed on. I already had some sheer ribbon saved from a gift wrapping (see - hoarding stuff for years pays off!), and a small pick of plain black, trimmed feathers.

iris fascinator, $10.99
slide comb, 79c
hat veiling, 35cm at $5.99 a metre, $2.10
flower, $5.99
iridescent black, trimmed feather pick $4.99
total $24.86

While this may seem quite an outlay for raw materials, you will find this is only the starting price for a basic ready made one that isn't likely to be as well crafted or fancy as one you can make yourself. I estimate I put 4 hours work into mine. To buy one like it would definitely be over $50, and probably closer to $100. Part of the pleasure of such a project of course, is not just the monetary saving but the creative part and knowing you have something at the end that is unique, and made especially for you by you. That is priceless :)

Look around and see ready made fascinators.
Fashion shops such as Portmans and Sportsgirl, as well as the millinery department of Myer sold them this season. Notice the shape and composition. Some are spikey and architectural, others are softer or fluffier. This will give you a stronger idea about how to compose your own, and what will suit your style.

Think about the style and colour of the outfit you plan to wear it with and decide on a colour scheme.
I went for something that will go with a range of outfits rather than one in particular, and my favourite colours.

Choose your base first, then have a play around with the assortment of materials until you find a composition that is pleasing to your eye.

The feathers, flowers and etcetera you choose is the star, not the base. Make sure you have enough. I made 6 little fans in burgundy sheer ribbon to provide body, contrast and help break up the shape of the base. It makes a cheap and easy filler, but because it's gauzy it's not visually too heavy.

Consider your partner if you have one, by avoiding trims such as big, rigid feather quills that may take his eye out!


Construction
Hand sewing it all is best, though a little craft glue here and there may also be helpful.
Have a mirror handy thoughout the process as you are constructing the fascinator to suit your face.
Check out fascinators online to see how they are worn in terms of placement on the head.
In front of a mirror decide where on your head you will wear it. This will help you know how best to sew your slide comb or other hair accessory to the base. Take note of where it is in relation to a facial feature such as the corner of your eye, and draw a simple diagram of this. It will assist the fitting process and ensure consistency.

If you are making a veil this is where it gets fiddly and you can expect to have a few tries before you get the shape just right. Seeing veiled fascinators on the internet and the different ways they can sit is particularly helpful.
Trim the edges straight. I trimmed mine to each intersection.
In front of the mirror, put the base on your head. Fold the veil so that it wraps around your face.
For mine I did a bit of folding at the corners with a little bit of bunching in the middle. The veil material is fine so when it is a little bunched it isn't very bulky and easily concealed by a feather etc. Once I found the right veil shape I held it in place with my fingers while carefully slipping the base off my head. After lightly sewing it in place, I rechecked the fit and added a few more stitches.*

With the aid of a mirror I decided how I wanted the main feathery plume to sit. Note how its curve curls around my head, and does not stand up like a cockatoo. That is what makes it classy rather than sassy. Not that there's anything wrong with sassy but that wasn't the flavour I was going for.

The trimmed feathers add a bit of volume and textural interest.
They were attached to the main plume with stitching and a bit of craft glue to hold the stitches in place.
Next I added the flower, again with the aid of a mirror, to ensure it sat right when worn. This was stitched and glued to the feathers, which in turn were stitched to the base.
Lastly I made a series of simple mini fans out of sheer ribbon. In addition to colour and contrast they also help conceal the ends of the feathers and the stump of the flower stem. To make them, I carefully folded them like paper fans about 1cm wide, stitched them together when I thought they were thick enough, then snipped them from the length of ribbon (rather than snipping lengths of ribbon then folding them). I quickly sealed the raw ribbon edges with a lighter to prevent fraying. I made about 3, sewed them on then decided I needed about 3 more.

Hope that was helpful :D

*Hint:If after all of that you find your veil isn't sitting perfectly you might be able to cheat a little by hooking it into bobby pins in your hair, as I did on one side.

[edit 16/02/08]
As promised (see comments) a photograph showing just the fascinator, which should make my explanation that little clearer, and the project a little bit more tempting as well!
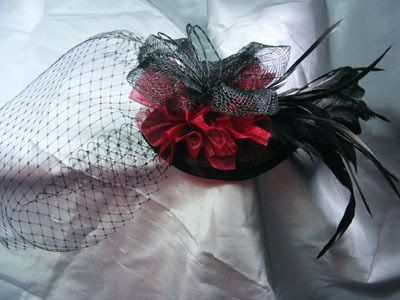
fascinator only

EDIT November 2009:
Here's another facinator project to tempt you
How to Make a Fascinator: Part 2.

Friday, February 02, 2007

Nuke an instant artefact

Listening to : All is Full of Love by Bjork

Got dud CD burns or other CD/DVD material you don't want? Perhaps you want to jazz up your existing CD coasters. Or maybe you just want to do something slightly dangerous with an element of science/experimentation ala Myth Busters.

Nuke an instant artefact!

You will need a:
CD
microwave oven
paper towel or a piece of paper

Put the paper/paper towel on the microwave oven carousel, and place CD on top on it, label down.
For 1500W ovens: nuke for 2 seconds
For 800W ovens: nuke for 5 seconds
Don't press your nose to the glass but watch as you nuke it for the exciting blue sparking and a small cracking noise as the tracks go pop!
Take care when removing the disk from the microwave as there will be a small amount of fumes. Give it a little rinse with cool water to remove loose label fragments.
Take a look at it. It should have gone from something new and shiny to something that looks instantly aged with interesting track patterns. Nifty or what? If you use a piece of glossy paper like I did, you will see the track patterns on it.

Thanks to Pandita for this one :) The lady is a fount of interesting things. She showed this trick to me with a demo Olivia Newton John Christmas CD at work. Mwahahaha!


Disclaimer: Lady Meerkat accepts no responsibility for damage to equipment or persons who try this experiment for themselves.

Sunday, December 19, 2004

How to Blow Eggs – Clip and Save for Easter!

Our neighbour gave us some duck eggs but we didn’t get around to using them. I decided to save their shells for an art piece somewhere down the line, or in a window display.

You will need a bowl and a sharp embroidery needle. Use the needle to carefully pierce each end of the shell. Use it or a skewer to get in there and pierce the yolk.

My brother came up with a new way to blow eggs out. Traditionally you would do this with your mouth and probably burst some of your facial capillaries or feel giddy from hyper-ventilating. A better way is to get a pump with a needle attachment as you would use for a football etc. It means that you won't need to make quite so big pair of holes. Around 1.5mm to 2mm should be sufficient for your exit hole and whatever width you need for the pump's needle. If you pump it as you would for a ball you will pop the egg, which I did on the first go. Do it slowly and you can successfully empty the egg of its contents. You can then rinse them out thoroughly by forcing water into them with your mouth or if you don’t care for that, a syringe of water, or submerge them in cool to luke warm soapy water.

If the eggs you are blowing are fresh you could make an omelette with the eggs' contents and mix that into a stir fry, mix the raw egg it into some hamburger mince or even a cake. With a bit of planning it need not go to waste.