Showing posts with label food. Show all posts

Monday, February 18, 2019

How to: Cut a whole pineapple

You will need a sharp knife with a blade of at least 15cm/6" for safest and best results. 
I have used an IO Shen utility knife.

As a child I observed my (Indian) mum many times cutting up a pineapple, and thus I learnt how. 
This style of pineapple cutting apparently is quite well known in Asia. 
Unlike commercial methods, very little edible material is wasted.
1. Remove top
2. Shave away skin
3. Remove base
4. Make shallow V shaped cuts 
to remove the 'eyes', 2 or 3 at a time.
Keep on cutting around the pineapple. 
The V shaped cuts should mostly connect up into channels all around it.


5. Cut up pineapple into slices.
6. For easy storage, cut slices into quarters, and cut off fibrous core from the corner
7. Most efficient packing suggestion in a square, 1L container.

Teff

Hey kids! Are you tired of breakfast being worth getting up for? Are you sick of hearing about the latest superfood being jacked up in price and availability because all of the hipsters are eating it? 
You need teff porridge!
Guaranteed to taste like last year's cardboard moving box after being soaked for 24 hours in a laundry bucket, even when doused in maple syrup. With a flavour like that it won't be on Instagram or at your local cafe anytime soon. 
TEFF! 
It's good for what ails you.
Probably.
#teff #doyourselfafavour #supergrain #nope

Sunday, December 31, 2017

How to drain, open and deflesh a coconut.

I learnt how to process a mature coconut via my dad. Use a corkscrew to drill out two of the 'eyes'. Flip over and sit over a glass to drain the water.  Use a wood saw to carefully cut in half. You can create a perimeter or just cut right through. Rinse sawdust off with water. Use a butter/table knife to remove flesh. Start from the cut edge, score the flesh then push the blade flat against the shell and twist. It will pop right off with the edible brown skin. If you don't want that you can shave it off with a knife or peeler. 

Friday, October 21, 2016

How to cut up a pumpkin

Back in June in a cycling accident, a car cut me off and my arm was broken, in a sling. I got my brother to help with things around the house including cutting up a whole pumpkin.

Whole pumpkins are an easy way to avoid plastic while still enjoying pumpkin. They have a good shelf life uncut if stored in a cool, dark place. After cutting the pieces will keep for days in a container the fridge, or you can roast then freeze it. I do a bit of both.

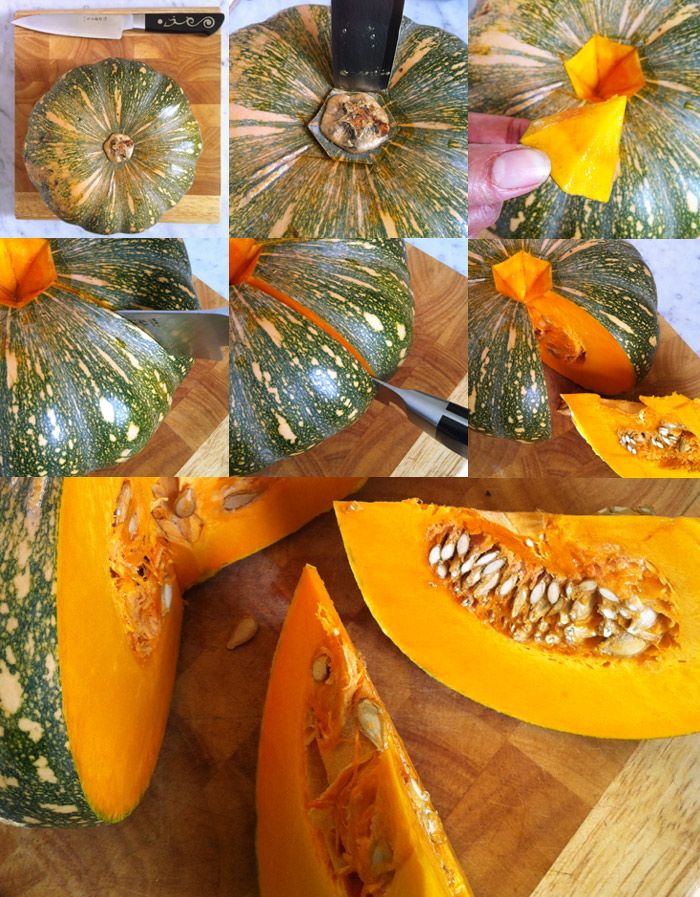
My brother improvised the following technique using my paring knife which is usually a big no-no with pumpkins. I was a little worried he'd snap it! I was so impressed with the process, I have documented myself doing it - with a 16cm chef's knife - so you can. Essentially you carve out just the stalk and cut it up into segments and clean up as usual. The key is how you deal with the stalk as it's the hardest part to cut through. With this you don't cut the stalk at all.

Use the tip of the knife to make a series of cuts about an inch deep, close around the stem angled towards the centre. The number of incisions determines the shape created and is dependent on the diameter of the stem.  In this case, for a Kent aka Japanese pumpkin, it's in the shape of a hexagon. Lift the stalk out and you have a pumpkin diamond! Once the stem is gone it's like cutting a big round carrot. Cut along each groove into wedges then do whatever it is you do with pumpkin.

 photo PumpkinCutting_zpsvfszwfpt.jpg


 photo PumpkinPeeling_zpslpjec7v8.jpg
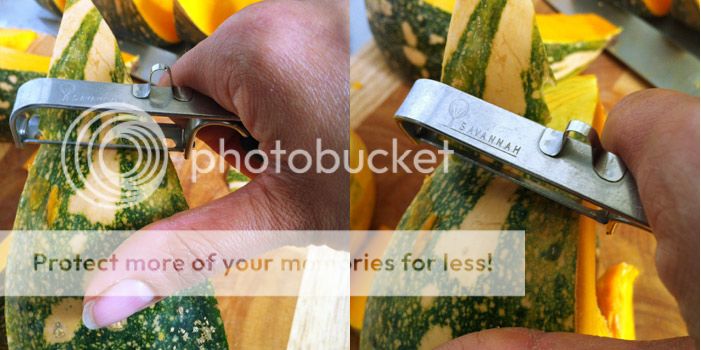
I use a peeler rather than a knife to peel, as there is less flesh wasted, it's quicker and safer. Hold pumpkin wedge in one hand and start peeling from the corner, then flip it around to do the other end. An inline peeler as seen here or a Y shaped peeler are equally good; it just depends on what is comfortable for you.

Friday, October 14, 2016

Vegetarian Baked Potato

1 washed potato, jacket on
1 avocado
1 clove of garlic, in skin
3 tablespoons Greek yoghurt
A handful of greens to wilt eg baby spinach, chickweed etc.
A twist of lime juice
A small nob of butter (optional)
Freshly ground salt and pepper


Preheat oven to 200C
Skewer potato 
Put potato and clove of garlic in oven proof vessel and bake. 
Remove garlic after 15 minutes. Squeeze out from skin.
Bake potato for an hour or until cooked.
While potato is baking combine lime juice, roasted garlic flesh, and yoghurt in small bowl.
Wilt greens in microwave, or in a pan with a lid or by washing over with boiled water.
Put potato on plate, and cut in half then - depending in size and shape -quarters or sixths.
Place small dabs of butter in cut potato.
Distribute greens over potato, then slices of avocado.
Dollop yoghurt mixture on top.
Season to taste.


Wednesday, October 05, 2016

Compulsory Palm Oil Labelling in Australia

Here we are at Federation Square, Deakin Edge last night to help promote
the petition to make labelling palm oil compulsory in Australia.
Parliament will decide next month, so it's important we get as many signatures as we can now. Hoping to get 100,000! Please help by signing and sharing.

The orangutan is the gardener of the forest, spreading seeds to create more forest, an umbrella species that others like tigers and rhinos, and countless more rely on.

#labelpalmoil #iwantthechoice #dontpalmusoff #turnmelbourneorange #inyourpalm #orangutan #endangered

Melbourne Zoo , as organisers of both the petition and event, donated 1000 orangutan plush toys which were hidden outside of Deakin Edge, and seated throughout the auditorium. The plushies were for everyone to find, as a reward for attending and promoting this important petition. These toys represent the real live orangutans lost to unsustainable palm oil production every year. At this rate they will be extinct within a decade. Attendees were actively encouraged to take selfies with their plushy, and use the hash tag #labelpalmoil when posting it on social media. Also there were bags of oranges kindly donated by Orange World. Thanks for the juicy evening snack Orange World!

Afterwards we were instructed to swarm/surround Livinia Nixon doing the weather report. I mimed my plushy Kiani, to also do the weather report. I hope we were in frame because it would have been HILARIOUS.

The lower left corner image is a live study of Maimunah, using an enrichment puzzle at the Royal Melbourne Zoo. You can see this drawing on Instagram as the initial live study if you're on there:
https://www.instagram.com/p/BLHZd1NhS-I/?taken-by=patriciadenisartist
I'll be posting an exclusive work in progress shot here.
And the final drawing here first.

Finally there is a free shopping app. for your phone to help you shop ethically now, by avoiding unsustainable palm oil. Read about it here.

Friday, September 30, 2016

Waste Deep


WASTE DEEP from SustainTable on Vimeo.

The title says it all. Made in Melbourne - I'm soproud of my city, we're awesome, we do awesome things!

Thursday, September 15, 2016

Spell broccoli correctly!

Brocoli?
Broccolli?
Brocolli?
Broccoli?

Never mind that English is my first language - I have trouble remembering how many Cs versus how many Ls there are in the word broccoli. Sure, in this age of autocorrect and spellcheck it's less critical than it used to be, but what about your hand written shopping list, or wrapped up, plastic free produce you have labelled in your crisper?

Here is a handy typographic I have just come up with to help me spell broccoli correctly everytime. Remember :
You only need one L to make the stalk
The choicest broccoli has a nice big head in proportion to the stalk, so extra Cs!


Friday, September 02, 2016

Pasta Porn

On a pack of Italian pasta, this lovely, retro illustrated seal is disturbing in at least three ways.


Firstly there is a bit of Pasta Inception happening because she is holding another packet of pasta. The actual seal is on the back of the pack so it isn't visible in the illustration. I'm as disappointed as you are about that.


Secondly the act of unsealing the pack is a bit like ripping off her skirt due to the alignment of it and the pull tab. Weird is one word for it. A bit wrong might be another way of putting it. I wonder how a rape survivor would feel about it... 

Lastly, I would like to draw your attention to the blue triangle under her knee - and the main reason why I'm writing 
ie. Where is her other leg and the rest of her skirt?!

Don't worry I have worked it out for you:


You're welcome.

Friday, August 05, 2016

Rejecting Plastic Bags

I don't claim to be living a plastic free life but I have made significant changes since participating in Plastic Free July last year. Do visit the site to learn more.

Here are my own top tips for rejecting single use plastic bags.

Take the plastic/rigid floor out of your reusable bags so you can fold them up smaller. 
Here is my folding technique as used on a cotton bag but it also works for any tote style reusable shopping bag.


  1. Lay it out flat.
  2. Fold the sides into line with the handles.
  3. Roll firmly into a cyclindrical shape from the base up to the handles.
  4. Take one handle in the opposite direction to the other, around the cylinder.
  5. Tie in a single, firm knot to secure.
  6. Done!
Keep at least one reusable bag in your car at all times.
Only buy what fits in that bag/s.

Be prepared but also be prepared for when you're not prepared. 

How?  
Keep a folded up reusable bag in your work bag/hand bag.
It could be one you have folded as above or a ready made, extra compact bag eg. I love my Envirosax retro robot print bag because it's compact, easy to fold, looks good (different prints brought out every year!), strong, holds a lot and can be carried on my shoulder like a tote bag. Another cool, totally plastic free option are old fashioned, cotton string bags.
When you don't have a bag, don't buy anything. You will save money if you can get by without it. If it turns out to be inconvenient because you have to carry it in your hands, or go out again, this will motivate you to get into the habit of having a bag.

Most fresh produce doesn't need to be stored in plastic bags let alone bought in them. 
You can go completely without any form of bag for things like apples, carrots etc. There are some items that are easier to manage - eg salad greens, cherries, beans, nuts - that you will need a bag of some sort for.

Re-use plastic net bags from previously bought oranges, onions and discount green groceries for all of your new purchases. Or buy/make some lightweight mesh bags which are necessary loose leaf greens and beans in particular. Keep some of these with the bag in your car, or the bag in your work bag/hand bag.
Re-use your existing plastic bags to store produce in fridge. Once you have exhausted those - if that is possible - here is a plastic free produce storage guide.

My own findings:
Broccoli will keep really well if the cut end of the stalk is kept in water - like a cut flower because that is what it is - and the whole thing is wrapped in a cotton cloth.
Celery can be temporarily stored in a tall jug or bucket of water outside of the fridge. For long term storage of cut up celery stalks, keep immersed in water in a sealed container  - thank you to my housemate S for that one!

Here is a guide to plastic free bin lining for those of us who want bin liners.
In smaller bins I arrange 3 or 4 sheets in a cross and push in to fill. To dispose of, I gather up the sides and twist firmly closed. Then I add another sheet if it looks like it won't make it intact into the garbage truck. I use this for (bagless Dyson) vaccuum cleaner contents and it's very effective.

Thursday, August 04, 2016

Edible Weeds, Chickweed.

I got into edible weeds, and foraging in my garden via a book from CERES called Edible Weeds of Melbourne. You can find out more about it here.

 photo chickweedGARDEN_zpsyrznovjq.jpg
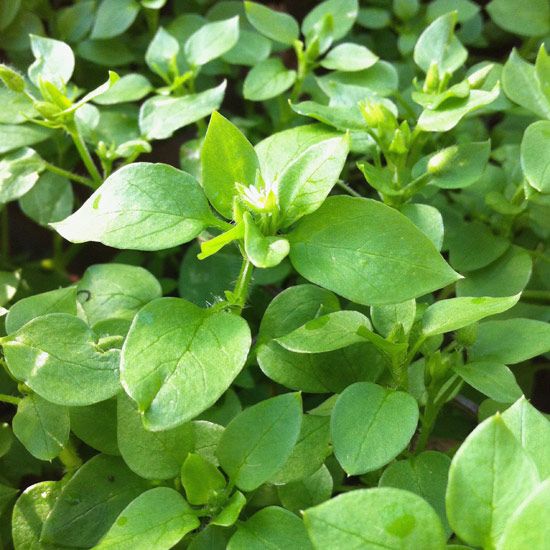
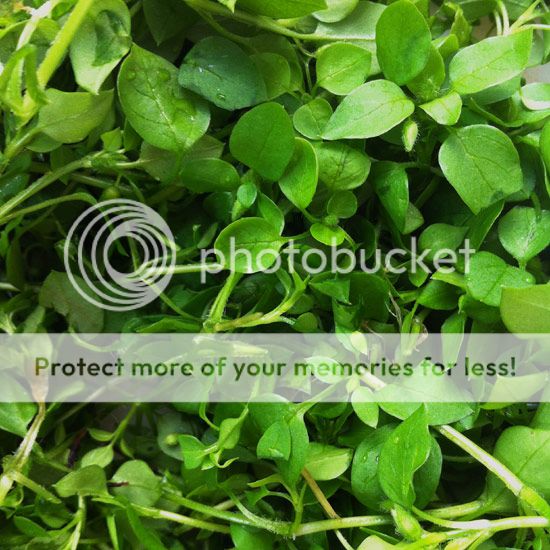
Chickweed growing in my garden. A seasonal weed, it is abundant during Winter coming into flower in late Winter, before dying off in Spring.

 photo chickweedPLANT_zpss9va4tb3.jpg
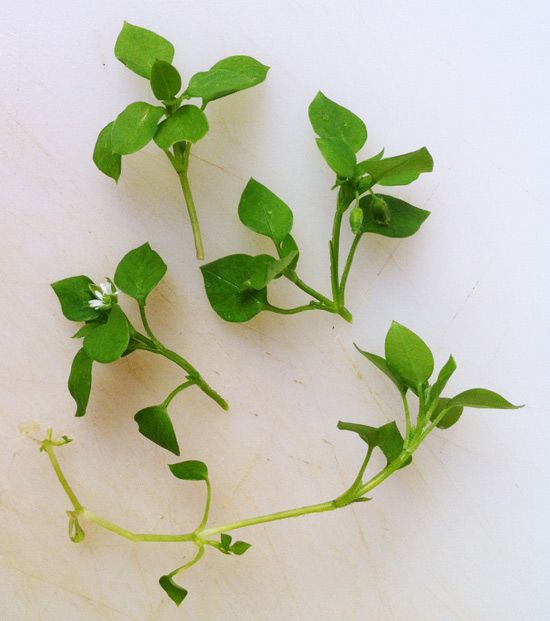
Clockwise from top left: typical growth - note the pointed leaf tips and alternating leaf pairs along the stem, in bud, section of plant with some roots, in flower like a tiny daisy.

Forage harvesting can be done in one of two ways. If you have the time and have an abundance of chickweed, you could weed  it out of the places you don't want it and snip off the best tendrils from the root hub. Or, if you can't be bothered with that, just snip off what you need from the plant. The snipping method is also cleaner because you aren't disturbing any soil.

 photo chickweedCHOPPED_zpsgsu5rw6f.jpg
Roughly chopped chickweed. While edible in lengths it's more palatable roughly chopped, and easier to stir through food.

After washing and draining, tip harvest into a pile on chopping board.
Make a some cuts across the pile in two directions to roughly chop it. You're are aiming to reduce the tendril lengths rather than end up with something finely chopped. It isn't necessary to be precise. That said, you might prefer a fine chop for your dish.

Use as you would spinach or any other greenery in its cooked form. I have it sautéed with garlic chives or garlic, wilted as an accompaniment to poached eggs, mixed into scrambled egg mixture, in curry, stir fried, wilted with pasta and pesto and a baked potato. The entire plant stems, flowers, and buds is fine to eat, but raw, only the fingernail-sized leaves are recommended and that is waaay too much mucking about for me!

Saturday, June 25, 2016

Almost a health food - if you squint - banana and chocolate mug cake

I've taken this recipe as a foundation and built my own.

How it is different and now mine:
I don't use oil, vanilla or chocolate chips.
Instead of sugar, I use a teaspooned dollop of golden syrup and a banana (broken up and pushed into the batter last). I use raw cacao.
I integrate the peanut butter - mine is made fresh into my own jar at The Source Bulk Foods, from just peanuts so I add a dash of salt. Salt enhances sweetness as does the cinnamon for the banana. I microwave it for 2 minutes.

Banana and Chocolate Mug Cake

Serves One.
You will need 1 large coffee/soup mug

Ingredients
4 tbsp plain flour
1 dolloped (scoop and coat spoon) teaspoon golden syrup
2 tbsp. raw cacao
1 free range egg
1 ripe to over ripe banana
3-5+ tbsp water or milk for richness (quantity depends how pudding like you want it)
1 teaspoon peanut butter (optional) or dessicated coconut
dash of cinnamon
pinch of salt

Method
Combine flour and cocoa in mug.
Add egg and combine well.
Mix in rest of ingredients except banana. Ensure no lumps/pockets of dry flour/cocoa.
Break or cut up banana and distribute in batter.
Microwave for two minutes.
Let it sit for a minute then enjoy!

Notes
You can leave out the peanut butter and substitute dessicated coconut if you're allergic and substitute other flour if you have dietary requirements.
Cocoa will work if you don't have cacao.
I reckon molasses would work instead of golden syrup but I haven't tried that yet. Let me know if you do :)
Add more water if you're vegan. It won't be quite as light but it will still be very tasty!


Monday, April 11, 2016

Pasta with Basil Cashew Pesto and Wilted Spinach

This is my favourite, no fuss, minimum mess, vegetarian lunch when I have homegrown basil. If I don't have spinach or suitable greens likes chickweed, I increase the parsley, add oregano and extra garlic chives to get some green goodness in there. Garlic chives are very easy to grow in a pot or the ground, as is Italian parsley.

Serves One
Ingredients
a cup/handful of spinach leaves
a small handful of fresh basil leaves
a smaller quantity of parsley (optional, good for balancing garlic heat)
one to two cloves of garlic depending on size OR 5-6 of garlic chive leaves if you like a milder garlic taste
freshly ground salt and pepper
olive oil
a small handful of roasted, salted cashews*
raw pasta for one

Method
While pasta is cooking:
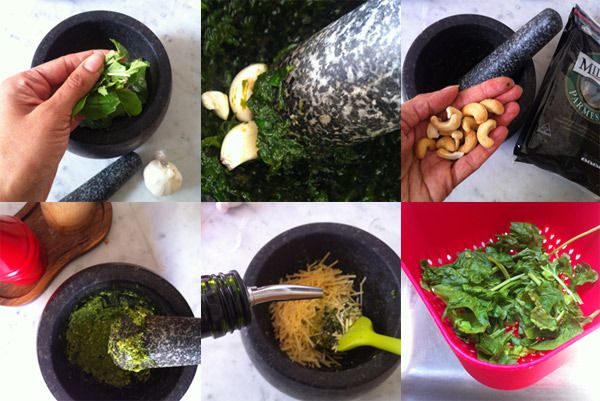
1. Rip herbs into smaller pieces and add to mortar. Grind.
2. Add peeled garlic and grind.
3. Add nuts and grind.

 photo SpinachPestoPasta6up_zps6rpvxeyb.jpg
4. You should end up with a bright green, thick paste like this. Season with salt and pepper.
5. Add a handful of grated parmesan and a good slurp of olive oil. Stir with flexible spatula into a thick paste.
6. Put ripped or chopped up fresh spinach leaves into a colander. Drain your freshly cooked pasta through colander to cook spinach.

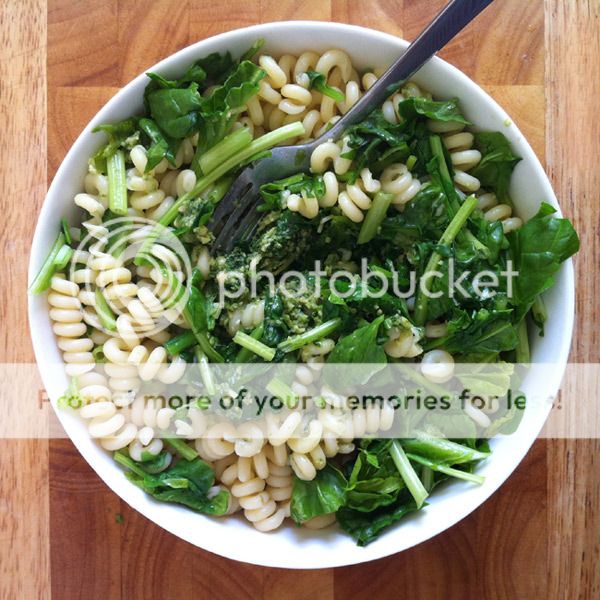
7.Tip contents of colander into large bowl, and stir through pesto. Serve immediately.
 photo SpinachPestoPasta_zpsjozzqyms.jpg

* or pinenuts or any roasted nut you like. Unroasted peanuts and macademias should work well

Friday, April 24, 2015

No fuss pesto

My letter to the manufacturer:

'I tried the new basil stir through pesto tonight. It was awful from the first mouthful. I had to add other things to it to make my dinner palatable. I wish I had just made my own pesto like I usually do. This pesto of yours is sweet and pesto should not be sweet at all.

There should not be any sugar in a pesto. Traditional recipes don't have it. As a refridgerated product you certainly don't need it. Even the non-refridgerated jars of pestos on the market aren't remotely sweet. Your product has over two teaspoons of sugar in each tub. That's more than most people put in a coffee. That's also more than there is salt and garlic in your product. Utterly wrong!

Unlike your other products, I would not buy or recommend this product to anyone.'

[edit 27/4/2015] To compensate for my unsatisfactory gastronomical experience, the manufacturer has offered to send me a coupon for the supermarket of my chosing.


No Fuss Pasta Pesto

I've made pesto for pasta enough times to be able to just throw it together without measurements, knowing it will be delicious. It's usually ready before my pasta is!

Cobble together these ingredients to a taste and texture you like, grinding in your mortar and pestle in the following order :
  • Fresh basil leaves - also works with fresh oregano, roughly chopped, about a handful to serve two
  • Freshly ground salt and pepper
  • Garlic cloves - roughly chopped
  • Pinenuts or other nuts - I usually have salted, roasted cashews on hand so I reduce the ground salt added. Peanuts also work well.
Now, get a little rubber or silicone spatula - never a metal implement, it will scratch the mortar- and mix in:
  • Parmesan cheese - traditionally, but whatever hard cheese you have to hand will do in a pinch
  • Olive oil - enough to turn the mixture into a paste
All you need is a mortar and pestle and you too can make your own. Yes you can do it in a processor but I suspect it will be a little different because you're cutting rather than crushing the ingredients. I recommend a granite mortar and pestle with a 12cm diameter on the mortar's inner bowl. It seems to be the optimum size: for speedy results on a good quantity; by not being too cumbersome to pick up off the bench and cradle if that's how you wish to grind; being easy to gently put in the sink and manipulate to wash. Always hand wash. Dark granite is better than marble because it won't stain.


Saturday, March 07, 2015

Oven Baked Falafel Recipe

I have adapted more than one online falafel recipe to arrive at one of my own. It was so popular at my last party that I promised to share the recipe with my guests. It went as follows:

Oven Baked Falafels

Ingredients
2 cups dried chickpeas
1 small brown onion, roughly chopped
1/4 cup fresh parsley,
3-5 cloves garlic
1 1/2 tbsp flour
1 3/4 tsp salt
1/4 tsp pepper
2 tsp ground cumin
1 tsp ground coriander
1/4 tsp cayenne pepper
a pinch of ground cardamon
1 1/2 tbsp tahini
sesame seeds to garnish or roll in to taste
olive oil (optional)

Method
Soak the chickpeas overnight in cold water.
Drain well.
Combine all ingredients in a food processor.
Set aside for 30 minutes to develop flavours.
Preheat oven to 220°C.
Line two baking trays with baking paper.
Use a teaspoon to scoop mixture, and roll into slightly flattened balls. Place directly onto baking paper - or onto a plate first if you're not sure about spacing.
Garnish with a pinch of sesame seeds - gently pat into the surface on top. Or, roll in sesame seeds if you are that way inclined!
Optional: spray lightly with olive oil. I use a refillable atomiser. The oil adds extra flavour and helps them brown up nicely, but you will still get a reasonable result without it.
Bake for 20 minutes or until golden brown.
Serve hot with dips. Hommus, tzatziki and aioli are harmonious combinations with these falafels.
Serve cold in a vegetarian/salad sandwich in place of meat.
Can be frozen.

Saturday, February 08, 2014

Good eggs and bad eggs - An old fashioned test

So your eggs are close to or past their recommended use by. Or maybe you have your own chooks and you're not sure how old your eggs are. Before you throw them out you can test them to see if they are still good. This is an old trick your grand mother would have used.

 photo egg_zps2f62e27c.jpg
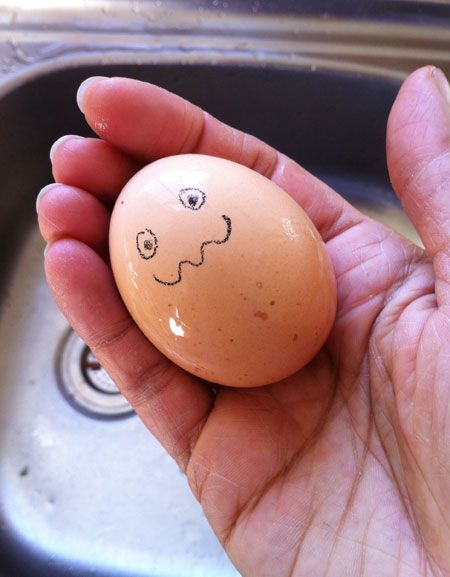
First take your egg. Funny face drawn on is optional (done with a Chinagraph / wax pencil)

Gently place it into a glass of water.
Make sure you choose a glass big enough for the egg to sink to the bottom.
If it sinks, it's a good egg and it's fine to eat.

 photo eggGLASS_zps96e3dec9.jpg
If it floats, it's a bad egg so do not eat it!
It floats because of the gas created as it decomposes.

I usually test a whole carton to see if any need to be disposed of, then retest them as I use them. I break our bad eggs directly into the compost bin.

Saturday, December 21, 2013

Chicken Twirl Mascot

I was unusually checking out Woolworth's frozen food section and was reminded why I don't usually do this:
 photo chickentwirl_zps0414e016.jpg
Chicken Twirls, Southern style.

 photo chickentwirlMascot_zps53b73cce.jpg
At least he seems like a polite mascot with hat doffed and toothy ah, disarming smile - even if his legs are a bit too heroically apart! Can you imagine him sitting on a horse? Why does he have a belt? What is that curious bulge at the top of his leg? Why am I calling it a him?

Saturday, November 30, 2013

Potted herbs

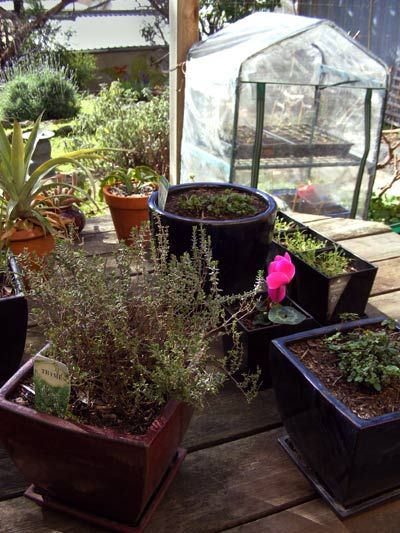
 photo herbtable_zpsf3575e7f.jpg
Potted herbs on an outdoor table are easy to look after and harvest.

My favourite garden herbs:
  • Thyme is a perennial and a pretty little plant. Tasty sprinkled on buttered, toasted bread but also in more complex things!
  • Oregano is also a perennial but needs to be trimmed back hard after flowering before returning in the spring flush with leaves. Lovely in pasta dishes and on pizza.
  • Chives and garlic chives are handy perennials when you want an onion or garlic hint without the full punch. Garlic chives are particularly easy to grow.
  • Italian parsley is an annual that grows so easily from seed that you need never buy fresh parsley again. Even a black thumb should be able to grow some! Cut some excess by the stalk, bundle with string to hang dry in a dark, warm place so that you will have some all year round. Better still, let some go to seed and save the seed to plant at intervals so you always have harvestable amounts.
  • Sweet Basil is annual you can grow from seed or buy a punnet full of seedlings. I prefer the punnet option because I want them NOW. Well soon anyway. The fragrance is divine. Freeze your excess leaves to add to pasta sauces and pestos over winter after your plants have died.

Wednesday, November 20, 2013

The feminine wiles of aubergines.

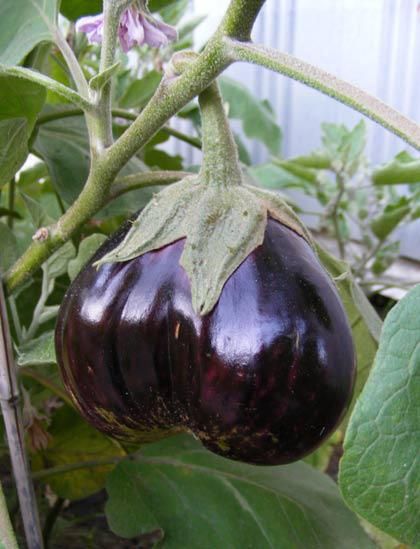
 photo Bootiliciousaubergine_zps8f528fc7.jpg
My housemate grew one bootilicious aka callipygian (cal·li·pyg·i·an) aubergine last Summer.

 photo femaleeggplant_zps3c52d886.jpg
I bought this one because I couldn't resist sharing her with you!

Ladies we should not be ashamed of our - or our fresh produce's - sexy parts. It's empowering to see female artists reclaiming female genitalia back from the censors and celebrating it as something beautiful, sensual and intimate. I'm not sure I'd want to wear it around my neck but to each her own!