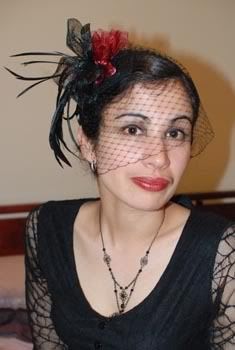
So last month I combined the two and made my own fascinator.

I was well chuffed with the final result and received many compliments - especially when I mentioned that I'd made it myself. The veil is delicate enough not to hamper vision though if driving I would fold it up just in case.
Materials and how to choose them
Making a stunning fascinator is very much about strong composition. For some of us this comes naturally, others may find it hard to make it come together. Even if you have an artistic eye, for your first attempt I highly recommend doing a bit of research first. Some of the materials are fragile and don't take to reworking kindly.
I bought most of mine from Lincraft in October when they became seasonally available. When I decided to buy my materials, the cheaper round base with sewn on slide comb was not available. I had to opt for the more expensive base and separate slide comb, which I sewed on. I already had some sheer ribbon saved from a gift wrapping (see - hoarding stuff for years pays off!), and a small pick of plain black, trimmed feathers.
iris fascinator, $10.99
slide comb, 79c
hat veiling, 35cm at $5.99 a metre, $2.10
flower, $5.99
iridescent black, trimmed feather pick $4.99
total $24.86
While this may seem quite an outlay for raw materials, you will find this is only the starting price for a basic ready made one that isn't likely to be as well crafted or fancy as one you can make yourself. I estimate I put 4 hours work into mine. To buy one like it would definitely be over $50, and probably closer to $100. Part of the pleasure of such a project of course, is not just the monetary saving but the creative part and knowing you have something at the end that is unique, and made especially for you by you. That is priceless :)
Look around and see ready made fascinators.
Fashion shops such as Portmans and Sportsgirl, as well as the millinery department of Myer sold them this season. Notice the shape and composition. Some are spikey and architectural, others are softer or fluffier. This will give you a stronger idea about how to compose your own, and what will suit your style.
Think about the style and colour of the outfit you plan to wear it with and decide on a colour scheme.
I went for something that will go with a range of outfits rather than one in particular, and my favourite colours.
Choose your base first, then have a play around with the assortment of materials until you find a composition that is pleasing to your eye.
The feathers, flowers and etcetera you choose is the star, not the base. Make sure you have enough. I made 6 little fans in burgundy sheer ribbon to provide body, contrast and help break up the shape of the base. It makes a cheap and easy filler, but because it's gauzy it's not visually too heavy.
Consider your partner if you have one, by avoiding trims such as big, rigid feather quills that may take his eye out!
Construction
Hand sewing it all is best, though a little craft glue here and there may also be helpful.
Have a mirror handy thoughout the process as you are constructing the fascinator to suit your face.
Check out fascinators online to see how they are worn in terms of placement on the head.
In front of a mirror decide where on your head you will wear it. This will help you know how best to sew your slide comb or other hair accessory to the base. Take note of where it is in relation to a facial feature such as the corner of your eye, and draw a simple diagram of this. It will assist the fitting process and ensure consistency.
If you are making a veil this is where it gets fiddly and you can expect to have a few tries before you get the shape just right. Seeing veiled fascinators on the internet and the different ways they can sit is particularly helpful.
Trim the edges straight. I trimmed mine to each intersection.
In front of the mirror, put the base on your head. Fold the veil so that it wraps around your face.
For mine I did a bit of folding at the corners with a little bit of bunching in the middle. The veil material is fine so when it is a little bunched it isn't very bulky and easily concealed by a feather etc. Once I found the right veil shape I held it in place with my fingers while carefully slipping the base off my head. After lightly sewing it in place, I rechecked the fit and added a few more stitches.*
With the aid of a mirror I decided how I wanted the main feathery plume to sit. Note how its curve curls around my head, and does not stand up like a cockatoo. That is what makes it classy rather than sassy. Not that there's anything wrong with sassy but that wasn't the flavour I was going for.
The trimmed feathers add a bit of volume and textural interest.
They were attached to the main plume with stitching and a bit of craft glue to hold the stitches in place.
Next I added the flower, again with the aid of a mirror, to ensure it sat right when worn. This was stitched and glued to the feathers, which in turn were stitched to the base.
Lastly I made a series of simple mini fans out of sheer ribbon. In addition to colour and contrast they also help conceal the ends of the feathers and the stump of the flower stem. To make them, I carefully folded them like paper fans about 1cm wide, stitched them together when I thought they were thick enough, then snipped them from the length of ribbon (rather than snipping lengths of ribbon then folding them). I quickly sealed the raw ribbon edges with a lighter to prevent fraying. I made about 3, sewed them on then decided I needed about 3 more.
Hope that was helpful :D
*Hint:If after all of that you find your veil isn't sitting perfectly you might be able to cheat a little by hooking it into bobby pins in your hair, as I did on one side.
[edit 16/02/08]
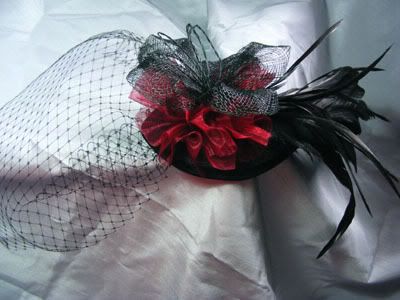
As promised (see comments) a photograph showing just the fascinator, which should make my explanation that little clearer, and the project a little bit more tempting as well!

EDIT November 2009:
Here's another facinator project to tempt you
How to Make a Fascinator: Part 2.
19 comments:
hi, just thought i would say well done on your creation . I am looking up items to make one for my daughters wedding and found this helpful. thank you.
Thank you for your feedback :) I'm pleased I have helped someone, especially for such a special day! There aren't many good online guidelines for this project which is why I took the time to write this up, and share what I learnt. I plan to post a close up pic of only the fascinator to make it even more useful. I just have to get around to uploading it!
Hi and many thanks for your usefull post. I would love to be able to make these lovely little crations and you have inspired me to have a go.
Munchkinlady, thanks for visiting. It gives me the warm and fuzzies to know I have inspired you to get creative :)
Thanks for your instructions. My cousins getting married and needs a few for the bridesmaids. but its only for the church service bit, because the church requires a head covering. Afterwhich the fascinators will no longer be used: So it doesnt seem worth buying them and also they need to be relatively simple and are just for the effect of a 'covering' of the head. Do you think it could be a acheived, using a comb or alice band so that it could be put on and then taken off without damaging hairstyles? Many thanks
Murewa
This particular one was made with a slide comb which doesn't mess up your hair if you're careful removing it.
I've seen fascinators which use Alice bands so that might be a better choice for you. I would be inclined not to have a veil on such a piece. A flower and some feathers - or some dried flexible, dyed cane/grass stuff (don't know what it's called but have seen it used on fascinators), bent into a few bowed shapes, softened with some feathers might be good.
Thanks for the info. You look fab. My wife wants me to make one for a forth coming wedding and i was looking for ideas . Pete
jThank you for sharing your creativity! I am actually looking to make one for halloween (corpse bride!!). I have a fascinator already so fingers crossed. I would never have thought of making my own until I saw this!! Thanks again :)
Anon, Pete - Thank you. Your wife is a lucky lady to have a craftsman hubby :)
Anon 2 Thanks for the feedback. This is the most visited part of my blog but hearing from visitors is always nice. Your Corpse Bride idea sounds cool!
GETTING MARRIED (ON BUDGET)SO MAKING MY HEADPIECE/VEIL WILL SAVE ME MONEY AND GIVE ME THE WARM AND FUZZIES:> THANKYOU SO MUCH FOR SHARING! WISH ME LUCK.
Good luck :)
I was browsing the internet for black and red veiled fascinators as I am having a black and red vintage wedding and I came across your blog and this neat entry on how to make your own.
Firstly... I love your fascinator. It's exactly what I want so I'm going to attempt my own. Your elegance astounds me.
Secondly... I met you briefly at Golgotha earlier in the year! Here are a couple of snaps we got with you.
http://i33.tinypic.com/2mypy76.jpg
I'm Kandi by the way (in the top photo with you). =)
BoutiqueObscura aka Kandi
It's the right time to make one here in Melbourne as much of that stuff is now on sale. IMHO you can't go wrong with black and red!
Thank you :*)
My recollection of that night is so vague I barely remember having that photo taken ... so it must have been a good night :P
Wow, i cant believe you made this yourself! I was just surfing the net and thinking how expencive fascinators are to buy when they're probably so cheap to buy. It gives me confidence to know that someone was able to make one of their own that looks so proffessional
thanks
What a beautiful tutorial and gorgeous fascinator! I blogged about it today - www.violette.ca
Violette, yeah I noticed I got a bit of traffic via your blog so I'm glad you commented here so I could say thanks.
Thank you :)
Thanks for your inspiration. I needed some guidance on my wedding fascinator. Good luck for future arts and craft creations. :)
Hi lady meerkat
I am getting quite a bit of traffic for fascinator's on my site . I would be happy to publish a article on your behalf on my site something similar to the one you have published here or then jsut permission to re-publish this.Please let me know
Email me at jeromejf at Hotmail.com
Regards
jeff ( www.melbournecupracebets.com)
Jeff,
I'm happy for you to republish this entry (or just the images if that's all you needed and you want to write your own article) with a credit and a link to my blog.
Cheers
Patricia aka Lady Meerkat
Post a Comment