Showing posts with label instructional. Show all posts

Sunday, September 03, 2023

DIY Plastic free, reclaimed aluminium can, plant tags


I work in a bush crew. One of the things I’ve noticed is that in conservation areas on significant plants they use metal swing tags/labels. I assume they are aluminium because the are inscribed and very light, with no corrosion.

I’ve come up with a way to make an economical and weather durable tag with things I have at home. 

This is a project for adults NOT kids. 
The cut aluminium can edges are moderately safe to handle without gloves if done carefully*
Avoid touching/handling the cut edges.
This project CAN NOT be completed with a steel can.


DIY Aluminium Plant Labels

You will need:

A clean aluminium can

A can opener that lifts off the top of the can

Scissors

A slightly rounded, smooth  metal point such as a darning needle. Mine is a metal fondant or wax working tool. 

A smooth blunt object to press folded metal such as a metal spoon. Mine is the other end of the aforementioned tool. 


Use can opener to remove top of can


Use scissors to cut straight along the length of the can. 
Make another parallel cut 4-5cm away from the first.
Cut between the two cuts to seperate from can.


Cut off non-flat sections from each end.

You should now have a rectangle of roughly 5x12cm


With the labelled exterior of the can facing you, fold along one long edge, about 4-5mm deep.

Fold the other long side over so that it slightly overlaps by 3-4 mm over the first fold. 


Make each fold crisp by pressing it.
Fold over from the broad fold, one corner.
Make the corner fold crisp.
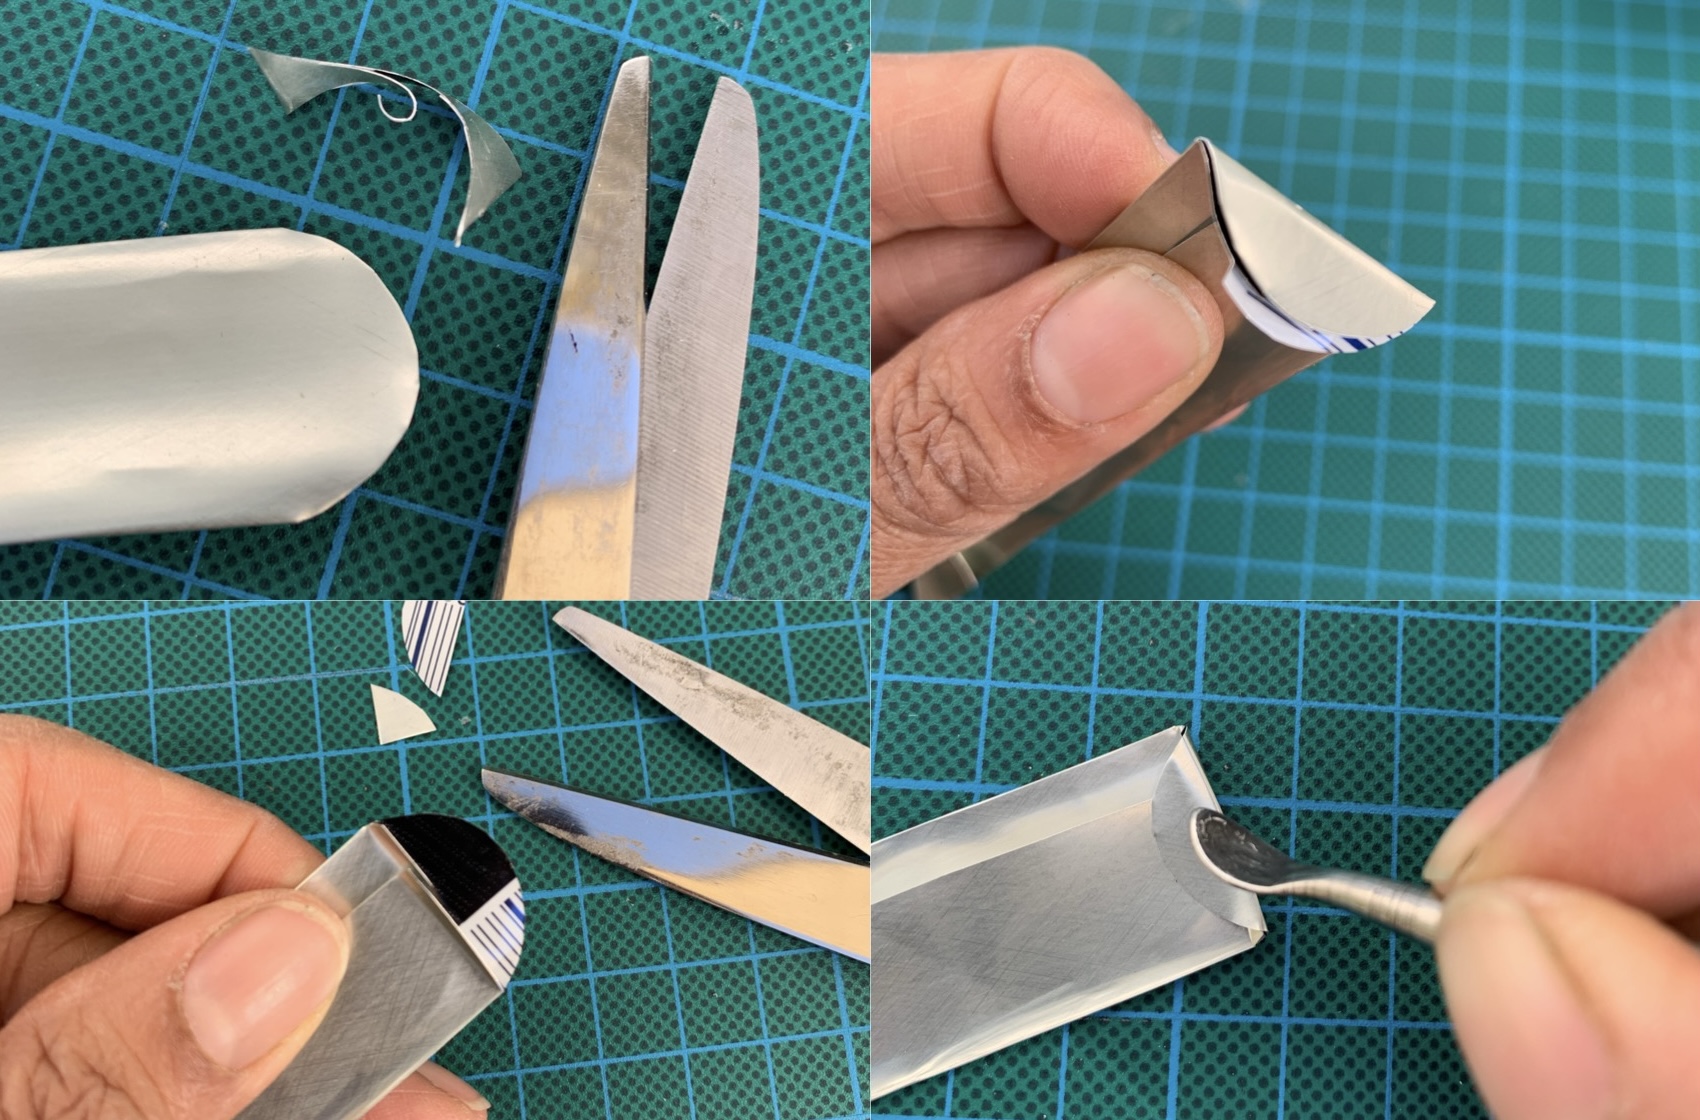

At the other end of the tag, use scissors to cut a semi circle or rounded corners.
Lightly fold over this rounded end towards other folds then fold back.
Snip off folded under layer to leave simple rounded flap.
Fold over rounded flap and press.


Use metal point to carefully write label. You will need to press so keep your lettering small and simple.


Finished!
Gently push into the soil or pot.


Label your plants however is useful to you. As a horticulturalist and revegetation worker, I want to remember the botanical names of the indigenous plants I’m planting. I’m in a rental, so I’m hoping that whoever lives here next will see these tags and respect the indigenous planting.


*While I made two cans worth of labels without cutting myself, others might not be so careful/lucky.  

Sunday, May 28, 2023

Homemade tool to open stuck Bosch washing pump filter cap

Official Bosch Instructions to open filter pump cap.

A common problem with the pump filter on recent Bosch washing machines is if enough or particular object clog it, it can seem impossible to unscrew and clear.

I watched a you tube clip about how to clear it and that seemed doable until I realised there are star headed screws holding the relevant parts together. I’d have to borrow tools to  do it that way. 

I realised the issue is leverage. I happened to have this piece of jarrah (hardwood) decking scrap which has a cut out for manual scroll sawing. It turns out to be exactly the right tool to give gentle leverage without damaging the plastic screw cap. 

Hopefully you can use this image taken on a 1cm grid to create a general template to make one yourself.

I recommend making one to anyone with this machine. Once I figured this out, I fixed my clog (3 bobby pins) very quickly: Quicker than the time it takes to watch either you tube clip or write this post!


Monday, February 18, 2019

How to: Cut a whole pineapple

You will need a sharp knife with a blade of at least 15cm/6" for safest and best results. 
I have used an IO Shen utility knife.

As a child I observed my (Indian) mum many times cutting up a pineapple, and thus I learnt how. 
This style of pineapple cutting apparently is quite well known in Asia. 
Unlike commercial methods, very little edible material is wasted.
1. Remove top
2. Shave away skin
3. Remove base
4. Make shallow V shaped cuts 
to remove the 'eyes', 2 or 3 at a time.
Keep on cutting around the pineapple. 
The V shaped cuts should mostly connect up into channels all around it.


5. Cut up pineapple into slices.
6. For easy storage, cut slices into quarters, and cut off fibrous core from the corner
7. Most efficient packing suggestion in a square, 1L container.

Sunday, December 31, 2017

How to drain, open and deflesh a coconut.

I learnt how to process a mature coconut via my dad. Use a corkscrew to drill out two of the 'eyes'. Flip over and sit over a glass to drain the water.  Use a wood saw to carefully cut in half. You can create a perimeter or just cut right through. Rinse sawdust off with water. Use a butter/table knife to remove flesh. Start from the cut edge, score the flesh then push the blade flat against the shell and twist. It will pop right off with the edible brown skin. If you don't want that you can shave it off with a knife or peeler. 

Sunday, December 17, 2017

How to: decorate indoor pot plants with old bonbon cases

A little brainwave I had today and thought others would appreciate. With the festive day approaching, consider saving used bonbon cases to decorate your small indoor plant pots next year. A home potted up plant decorated with bonbon cases would also make a nice gift 🎁

Peel apart and break apart the case into three sections. You only need two sections to complete a pot wrap 

Use the existing paper tab and slot to join two sections together. Alternatively a little sticky tape can be used.

Cut off the zigzag edges. I've used a stainless steel ruler and cutting knife for the neatest result but scissors are fine if you prefer. 

Check height fit on pot and trim back so cardboard won't get wet when watering your plant.

Tape in position tab side first.
Tape end snugly in place.

All done! 

You can coordinate your pots by using the different designs/colour ways from the same box of bonbons. 

🎄✨Merry Christmas!✨🎄


Friday, October 21, 2016

How to cut up a pumpkin

Back in June in a cycling accident, a car cut me off and my arm was broken, in a sling. I got my brother to help with things around the house including cutting up a whole pumpkin.

Whole pumpkins are an easy way to avoid plastic while still enjoying pumpkin. They have a good shelf life uncut if stored in a cool, dark place. After cutting the pieces will keep for days in a container the fridge, or you can roast then freeze it. I do a bit of both.

My brother improvised the following technique using my paring knife which is usually a big no-no with pumpkins. I was a little worried he'd snap it! I was so impressed with the process, I have documented myself doing it - with a 16cm chef's knife - so you can. Essentially you carve out just the stalk and cut it up into segments and clean up as usual. The key is how you deal with the stalk as it's the hardest part to cut through. With this you don't cut the stalk at all.

Use the tip of the knife to make a series of cuts about an inch deep, close around the stem angled towards the centre. The number of incisions determines the shape created and is dependent on the diameter of the stem.  In this case, for a Kent aka Japanese pumpkin, it's in the shape of a hexagon. Lift the stalk out and you have a pumpkin diamond! Once the stem is gone it's like cutting a big round carrot. Cut along each groove into wedges then do whatever it is you do with pumpkin.

 photo PumpkinCutting_zpsvfszwfpt.jpg


 photo PumpkinPeeling_zpslpjec7v8.jpg
I use a peeler rather than a knife to peel, as there is less flesh wasted, it's quicker and safer. Hold pumpkin wedge in one hand and start peeling from the corner, then flip it around to do the other end. An inline peeler as seen here or a Y shaped peeler are equally good; it just depends on what is comfortable for you.

Friday, September 16, 2016

Make a laundry filter for microfibres

After reading about synthetic microfibres becoming marine microplastics I was inspired by Blair Jollimore to improvise a filter I sit in my laundry tub.

 photo FilterAssembledISITU_zpsrnkijbdu.jpg

Each wash catches about a pea sized amount - when compressed into a ball between my fingers - of wet fibres. We are running a front loading washing machine with the hose running into the laundry tub rather than straight down into a pipe. If you are doing the same then this set up should work for you.

I recommend checking occasionally to see how the water is draining throughout the first wash to ensure there is no risk of overflow. It is possible to collect the fibres as they clump while there is water in the tub. Scrape your fingernails across the strainer then pinch and you should be able to clear it enough to improve the drainage. Top loader users should exercise greater caution as they do use more water, and this system will slow down the draining of water from the laundry tub.

To make this simple, microfibre laundry filter I used an off the shelf sink strainer, an oversized press button and a cut up fry splatter guard* to make a rigid filter.

 photo FilterDisassembled_zpspnidj8co.jpg

The press button allows me to detach the filter to clean it out between washes. You can find oversized press buttons at a haberdashery store. A regular sized press button may still work depending on the strainer's holes, but could be fiddly to use.

I got the stainless steel sink strainer and splatter guard from an independent kitchenware store. The fine aluminium mesh of the splatter guard is easily cut with a box cutter style, snap blade, utility knife leaving an edge that is safe to handle. The gauge of the holes is approximately 1mm. I had previously tried cutting up an old stainless steel sieve but it proved difficult to do neatly, without injury and it was tricky to clean out as a result. A scrap of flyscreen mesh while not as fine at about 2mm gauge, should still catch some fibres. When cutting the circle of the filter, it's better to cut it slightly too big in diameter than too small, because you will ensure the strainer holes are completely covered.
Confession: mine is a fraction undersized but I haven't gotten around to cutting a bigger one yet.
Attach the filter behind/under the strainer. It will filter better and be easier to clean than if you put it on top.

 photo FilterAssembled_zpsbvsc5ehp.jpg

Alternately, you can make the filter and strainer in one - ie sans button and premade manufactured strainer, basically a super fine DIY sink strainer - but I find this doesn't sit as well in the drain hole, and is prone to distortion, requiring adjustment to ensure a good fit for each use.

Clear your filter while wet after each use, by rubbing your finger over the surface.
Always remember to lift the whole assembly out of the drain hole before carefully removing the press button halves.
Avoid removing mid wash if you want to catch the most fibres.
Due to its buoyancy, there are a lot of fibres in the suds which won't drain away the way they usually do. Allow all water and frothy suds to drain and dissipate away before retrieving filter.

On the left, an entire wash's fibres, scale in millimetres. 
On the right top down from another singular wash the fibres: in the suds left in the tub post wash; cleaned from the filter only post wash; scraped from the top of the filter during the wash.

*super fine mesh, aluminium screen used when frying food that spatters. The one I used was by Metaltex.

Friday, August 05, 2016

Rejecting Plastic Bags

I don't claim to be living a plastic free life but I have made significant changes since participating in Plastic Free July last year. Do visit the site to learn more.

Here are my own top tips for rejecting single use plastic bags.

Take the plastic/rigid floor out of your reusable bags so you can fold them up smaller. 
Here is my folding technique as used on a cotton bag but it also works for any tote style reusable shopping bag.


  1. Lay it out flat.
  2. Fold the sides into line with the handles.
  3. Roll firmly into a cyclindrical shape from the base up to the handles.
  4. Take one handle in the opposite direction to the other, around the cylinder.
  5. Tie in a single, firm knot to secure.
  6. Done!
Keep at least one reusable bag in your car at all times.
Only buy what fits in that bag/s.

Be prepared but also be prepared for when you're not prepared. 

How?  
Keep a folded up reusable bag in your work bag/hand bag.
It could be one you have folded as above or a ready made, extra compact bag eg. I love my Envirosax retro robot print bag because it's compact, easy to fold, looks good (different prints brought out every year!), strong, holds a lot and can be carried on my shoulder like a tote bag. Another cool, totally plastic free option are old fashioned, cotton string bags.
When you don't have a bag, don't buy anything. You will save money if you can get by without it. If it turns out to be inconvenient because you have to carry it in your hands, or go out again, this will motivate you to get into the habit of having a bag.

Most fresh produce doesn't need to be stored in plastic bags let alone bought in them. 
You can go completely without any form of bag for things like apples, carrots etc. There are some items that are easier to manage - eg salad greens, cherries, beans, nuts - that you will need a bag of some sort for.

Re-use plastic net bags from previously bought oranges, onions and discount green groceries for all of your new purchases. Or buy/make some lightweight mesh bags which are necessary loose leaf greens and beans in particular. Keep some of these with the bag in your car, or the bag in your work bag/hand bag.
Re-use your existing plastic bags to store produce in fridge. Once you have exhausted those - if that is possible - here is a plastic free produce storage guide.

My own findings:
Broccoli will keep really well if the cut end of the stalk is kept in water - like a cut flower because that is what it is - and the whole thing is wrapped in a cotton cloth.
Celery can be temporarily stored in a tall jug or bucket of water outside of the fridge. For long term storage of cut up celery stalks, keep immersed in water in a sealed container  - thank you to my housemate S for that one!

Here is a guide to plastic free bin lining for those of us who want bin liners.
In smaller bins I arrange 3 or 4 sheets in a cross and push in to fill. To dispose of, I gather up the sides and twist firmly closed. Then I add another sheet if it looks like it won't make it intact into the garbage truck. I use this for (bagless Dyson) vaccuum cleaner contents and it's very effective.