Showing posts with label green hints. Show all posts

Sunday, September 03, 2023

DIY Plastic free, reclaimed aluminium can, plant tags


I work in a bush crew. One of the things I’ve noticed is that in conservation areas on significant plants they use metal swing tags/labels. I assume they are aluminium because the are inscribed and very light, with no corrosion.

I’ve come up with a way to make an economical and weather durable tag with things I have at home. 

This is a project for adults NOT kids. 
The cut aluminium can edges are moderately safe to handle without gloves if done carefully*
Avoid touching/handling the cut edges.
This project CAN NOT be completed with a steel can.


DIY Aluminium Plant Labels

You will need:

A clean aluminium can

A can opener that lifts off the top of the can

Scissors

A slightly rounded, smooth  metal point such as a darning needle. Mine is a metal fondant or wax working tool. 

A smooth blunt object to press folded metal such as a metal spoon. Mine is the other end of the aforementioned tool. 


Use can opener to remove top of can


Use scissors to cut straight along the length of the can. 
Make another parallel cut 4-5cm away from the first.
Cut between the two cuts to seperate from can.


Cut off non-flat sections from each end.

You should now have a rectangle of roughly 5x12cm


With the labelled exterior of the can facing you, fold along one long edge, about 4-5mm deep.

Fold the other long side over so that it slightly overlaps by 3-4 mm over the first fold. 


Make each fold crisp by pressing it.
Fold over from the broad fold, one corner.
Make the corner fold crisp.
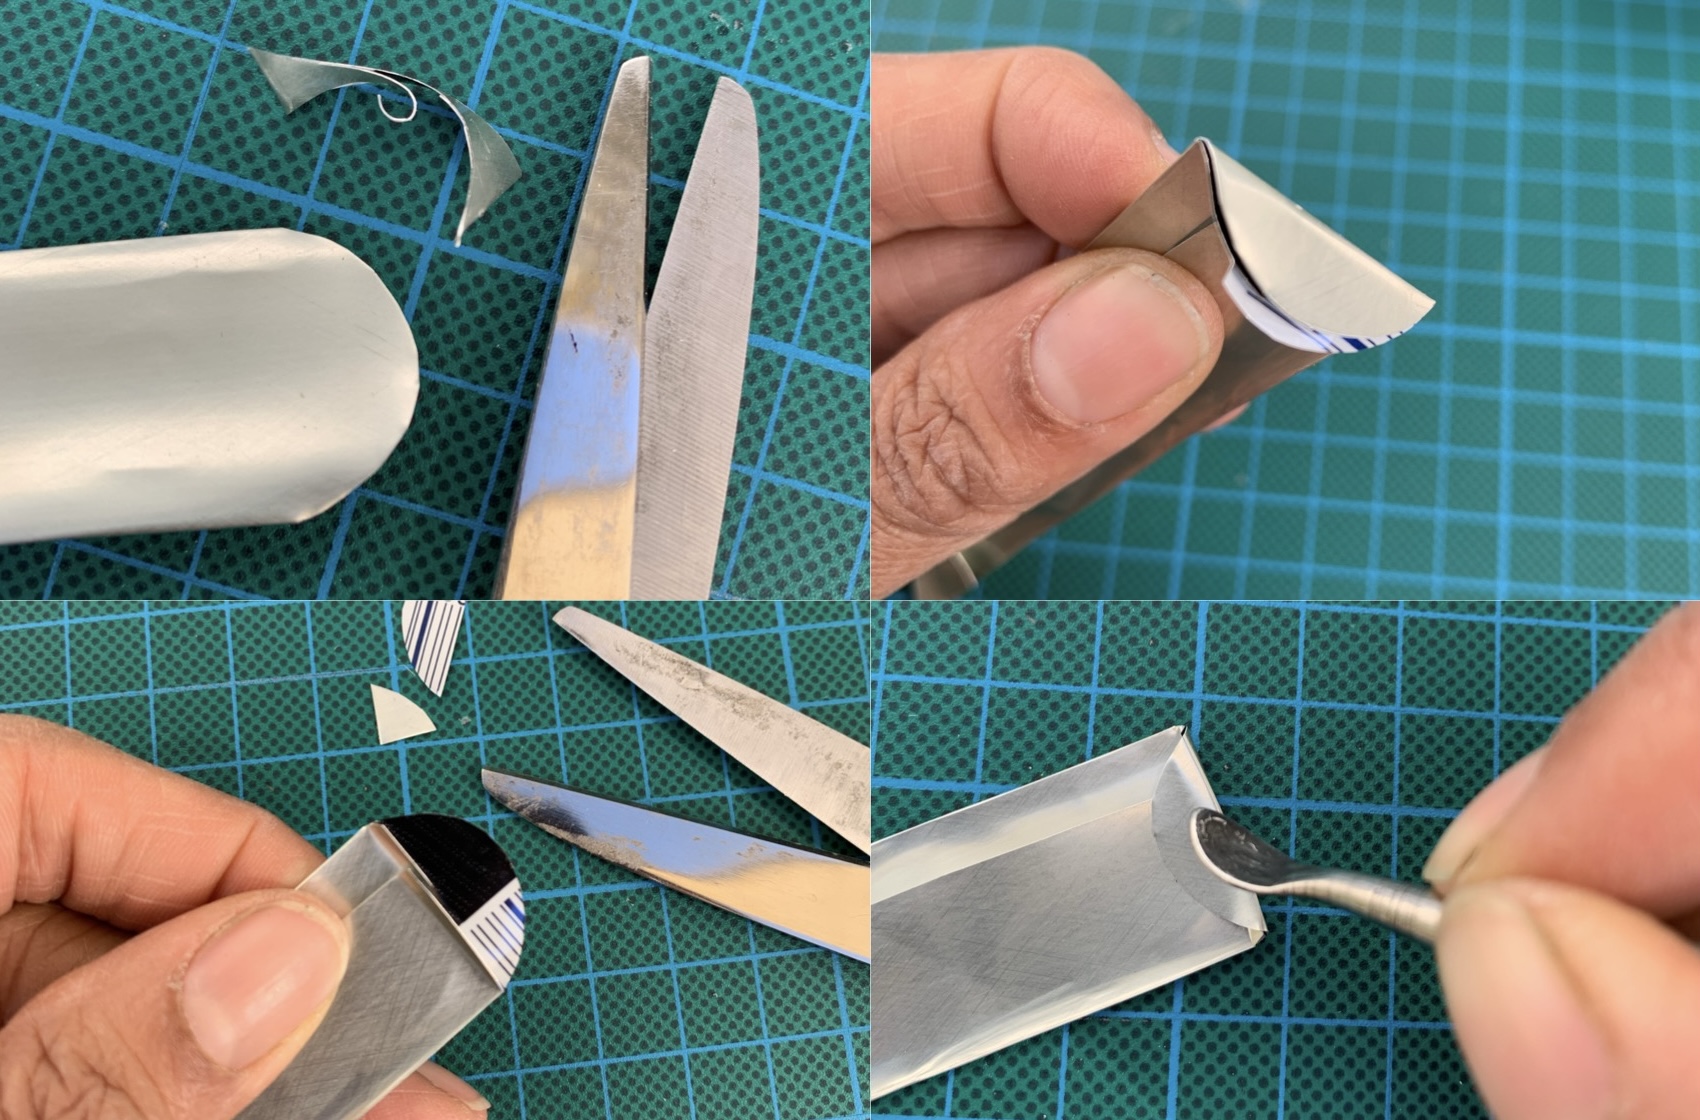

At the other end of the tag, use scissors to cut a semi circle or rounded corners.
Lightly fold over this rounded end towards other folds then fold back.
Snip off folded under layer to leave simple rounded flap.
Fold over rounded flap and press.


Use metal point to carefully write label. You will need to press so keep your lettering small and simple.


Finished!
Gently push into the soil or pot.


Label your plants however is useful to you. As a horticulturalist and revegetation worker, I want to remember the botanical names of the indigenous plants I’m planting. I’m in a rental, so I’m hoping that whoever lives here next will see these tags and respect the indigenous planting.


*While I made two cans worth of labels without cutting myself, others might not be so careful/lucky.  

Monday, February 18, 2019

How to: Cut a whole pineapple

You will need a sharp knife with a blade of at least 15cm/6" for safest and best results. 
I have used an IO Shen utility knife.

As a child I observed my (Indian) mum many times cutting up a pineapple, and thus I learnt how. 
This style of pineapple cutting apparently is quite well known in Asia. 
Unlike commercial methods, very little edible material is wasted.
1. Remove top
2. Shave away skin
3. Remove base
4. Make shallow V shaped cuts 
to remove the 'eyes', 2 or 3 at a time.
Keep on cutting around the pineapple. 
The V shaped cuts should mostly connect up into channels all around it.


5. Cut up pineapple into slices.
6. For easy storage, cut slices into quarters, and cut off fibrous core from the corner
7. Most efficient packing suggestion in a square, 1L container.

Friday, October 21, 2016

How to cut up a pumpkin

Back in June in a cycling accident, a car cut me off and my arm was broken, in a sling. I got my brother to help with things around the house including cutting up a whole pumpkin.

Whole pumpkins are an easy way to avoid plastic while still enjoying pumpkin. They have a good shelf life uncut if stored in a cool, dark place. After cutting the pieces will keep for days in a container the fridge, or you can roast then freeze it. I do a bit of both.

My brother improvised the following technique using my paring knife which is usually a big no-no with pumpkins. I was a little worried he'd snap it! I was so impressed with the process, I have documented myself doing it - with a 16cm chef's knife - so you can. Essentially you carve out just the stalk and cut it up into segments and clean up as usual. The key is how you deal with the stalk as it's the hardest part to cut through. With this you don't cut the stalk at all.

Use the tip of the knife to make a series of cuts about an inch deep, close around the stem angled towards the centre. The number of incisions determines the shape created and is dependent on the diameter of the stem.  In this case, for a Kent aka Japanese pumpkin, it's in the shape of a hexagon. Lift the stalk out and you have a pumpkin diamond! Once the stem is gone it's like cutting a big round carrot. Cut along each groove into wedges then do whatever it is you do with pumpkin.

 photo PumpkinCutting_zpsvfszwfpt.jpg


 photo PumpkinPeeling_zpslpjec7v8.jpg
I use a peeler rather than a knife to peel, as there is less flesh wasted, it's quicker and safer. Hold pumpkin wedge in one hand and start peeling from the corner, then flip it around to do the other end. An inline peeler as seen here or a Y shaped peeler are equally good; it just depends on what is comfortable for you.

Friday, September 30, 2016

Waste Deep


WASTE DEEP from SustainTable on Vimeo.

The title says it all. Made in Melbourne - I'm soproud of my city, we're awesome, we do awesome things!

Friday, September 16, 2016

Make a laundry filter for microfibres

After reading about synthetic microfibres becoming marine microplastics I was inspired by Blair Jollimore to improvise a filter I sit in my laundry tub.

 photo FilterAssembledISITU_zpsrnkijbdu.jpg

Each wash catches about a pea sized amount - when compressed into a ball between my fingers - of wet fibres. We are running a front loading washing machine with the hose running into the laundry tub rather than straight down into a pipe. If you are doing the same then this set up should work for you.

I recommend checking occasionally to see how the water is draining throughout the first wash to ensure there is no risk of overflow. It is possible to collect the fibres as they clump while there is water in the tub. Scrape your fingernails across the strainer then pinch and you should be able to clear it enough to improve the drainage. Top loader users should exercise greater caution as they do use more water, and this system will slow down the draining of water from the laundry tub.

To make this simple, microfibre laundry filter I used an off the shelf sink strainer, an oversized press button and a cut up fry splatter guard* to make a rigid filter.

 photo FilterDisassembled_zpspnidj8co.jpg

The press button allows me to detach the filter to clean it out between washes. You can find oversized press buttons at a haberdashery store. A regular sized press button may still work depending on the strainer's holes, but could be fiddly to use.

I got the stainless steel sink strainer and splatter guard from an independent kitchenware store. The fine aluminium mesh of the splatter guard is easily cut with a box cutter style, snap blade, utility knife leaving an edge that is safe to handle. The gauge of the holes is approximately 1mm. I had previously tried cutting up an old stainless steel sieve but it proved difficult to do neatly, without injury and it was tricky to clean out as a result. A scrap of flyscreen mesh while not as fine at about 2mm gauge, should still catch some fibres. When cutting the circle of the filter, it's better to cut it slightly too big in diameter than too small, because you will ensure the strainer holes are completely covered.
Confession: mine is a fraction undersized but I haven't gotten around to cutting a bigger one yet.
Attach the filter behind/under the strainer. It will filter better and be easier to clean than if you put it on top.

 photo FilterAssembled_zpsbvsc5ehp.jpg

Alternately, you can make the filter and strainer in one - ie sans button and premade manufactured strainer, basically a super fine DIY sink strainer - but I find this doesn't sit as well in the drain hole, and is prone to distortion, requiring adjustment to ensure a good fit for each use.

Clear your filter while wet after each use, by rubbing your finger over the surface.
Always remember to lift the whole assembly out of the drain hole before carefully removing the press button halves.
Avoid removing mid wash if you want to catch the most fibres.
Due to its buoyancy, there are a lot of fibres in the suds which won't drain away the way they usually do. Allow all water and frothy suds to drain and dissipate away before retrieving filter.

On the left, an entire wash's fibres, scale in millimetres. 
On the right top down from another singular wash the fibres: in the suds left in the tub post wash; cleaned from the filter only post wash; scraped from the top of the filter during the wash.

*super fine mesh, aluminium screen used when frying food that spatters. The one I used was by Metaltex.

Friday, August 05, 2016

Rejecting Plastic Bags

I don't claim to be living a plastic free life but I have made significant changes since participating in Plastic Free July last year. Do visit the site to learn more.

Here are my own top tips for rejecting single use plastic bags.

Take the plastic/rigid floor out of your reusable bags so you can fold them up smaller. 
Here is my folding technique as used on a cotton bag but it also works for any tote style reusable shopping bag.


  1. Lay it out flat.
  2. Fold the sides into line with the handles.
  3. Roll firmly into a cyclindrical shape from the base up to the handles.
  4. Take one handle in the opposite direction to the other, around the cylinder.
  5. Tie in a single, firm knot to secure.
  6. Done!
Keep at least one reusable bag in your car at all times.
Only buy what fits in that bag/s.

Be prepared but also be prepared for when you're not prepared. 

How?  
Keep a folded up reusable bag in your work bag/hand bag.
It could be one you have folded as above or a ready made, extra compact bag eg. I love my Envirosax retro robot print bag because it's compact, easy to fold, looks good (different prints brought out every year!), strong, holds a lot and can be carried on my shoulder like a tote bag. Another cool, totally plastic free option are old fashioned, cotton string bags.
When you don't have a bag, don't buy anything. You will save money if you can get by without it. If it turns out to be inconvenient because you have to carry it in your hands, or go out again, this will motivate you to get into the habit of having a bag.

Most fresh produce doesn't need to be stored in plastic bags let alone bought in them. 
You can go completely without any form of bag for things like apples, carrots etc. There are some items that are easier to manage - eg salad greens, cherries, beans, nuts - that you will need a bag of some sort for.

Re-use plastic net bags from previously bought oranges, onions and discount green groceries for all of your new purchases. Or buy/make some lightweight mesh bags which are necessary loose leaf greens and beans in particular. Keep some of these with the bag in your car, or the bag in your work bag/hand bag.
Re-use your existing plastic bags to store produce in fridge. Once you have exhausted those - if that is possible - here is a plastic free produce storage guide.

My own findings:
Broccoli will keep really well if the cut end of the stalk is kept in water - like a cut flower because that is what it is - and the whole thing is wrapped in a cotton cloth.
Celery can be temporarily stored in a tall jug or bucket of water outside of the fridge. For long term storage of cut up celery stalks, keep immersed in water in a sealed container  - thank you to my housemate S for that one!

Here is a guide to plastic free bin lining for those of us who want bin liners.
In smaller bins I arrange 3 or 4 sheets in a cross and push in to fill. To dispose of, I gather up the sides and twist firmly closed. Then I add another sheet if it looks like it won't make it intact into the garbage truck. I use this for (bagless Dyson) vaccuum cleaner contents and it's very effective.

Thursday, August 04, 2016

Edible Weeds, Chickweed.

I got into edible weeds, and foraging in my garden via a book from CERES called Edible Weeds of Melbourne. You can find out more about it here.

 photo chickweedGARDEN_zpsyrznovjq.jpg
Chickweed growing in my garden. A seasonal weed, it is abundant during Winter coming into flower in late Winter, before dying off in Spring.

 photo chickweedPLANT_zpss9va4tb3.jpg
Clockwise from top left: typical growth - note the pointed leaf tips and alternating leaf pairs along the stem, in bud, section of plant with some roots, in flower like a tiny daisy.

Forage harvesting can be done in one of two ways. If you have the time and have an abundance of chickweed, you could weed  it out of the places you don't want it and snip off the best tendrils from the root hub. Or, if you can't be bothered with that, just snip off what you need from the plant. The snipping method is also cleaner because you aren't disturbing any soil.

 photo chickweedCHOPPED_zpsgsu5rw6f.jpg
Roughly chopped chickweed. While edible in lengths it's more palatable roughly chopped, and easier to stir through food.

After washing and draining, tip harvest into a pile on chopping board.
Make a some cuts across the pile in two directions to roughly chop it. You're are aiming to reduce the tendril lengths rather than end up with something finely chopped. It isn't necessary to be precise. That said, you might prefer a fine chop for your dish.

Use as you would spinach or any other greenery in its cooked form. I have it sautéed with garlic chives or garlic, wilted as an accompaniment to poached eggs, mixed into scrambled egg mixture, in curry, stir fried, wilted with pasta and pesto and a baked potato. The entire plant stems, flowers, and buds is fine to eat, but raw, only the fingernail-sized leaves are recommended and that is waaay too much mucking about for me!

Monday, April 11, 2016

Pasta with Basil Cashew Pesto and Wilted Spinach

This is my favourite, no fuss, minimum mess, vegetarian lunch when I have homegrown basil. If I don't have spinach or suitable greens likes chickweed, I increase the parsley, add oregano and extra garlic chives to get some green goodness in there. Garlic chives are very easy to grow in a pot or the ground, as is Italian parsley.

Serves One
Ingredients
a cup/handful of spinach leaves
a small handful of fresh basil leaves
a smaller quantity of parsley (optional, good for balancing garlic heat)
one to two cloves of garlic depending on size OR 5-6 of garlic chive leaves if you like a milder garlic taste
freshly ground salt and pepper
olive oil
a small handful of roasted, salted cashews*
raw pasta for one

Method
While pasta is cooking:
1. Rip herbs into smaller pieces and add to mortar. Grind.
2. Add peeled garlic and grind.
3. Add nuts and grind.

 photo SpinachPestoPasta6up_zps6rpvxeyb.jpg
4. You should end up with a bright green, thick paste like this. Season with salt and pepper.
5. Add a handful of grated parmesan and a good slurp of olive oil. Stir with flexible spatula into a thick paste.
6. Put ripped or chopped up fresh spinach leaves into a colander. Drain your freshly cooked pasta through colander to cook spinach.

7.Tip contents of colander into large bowl, and stir through pesto. Serve immediately.
 photo SpinachPestoPasta_zpsjozzqyms.jpg

* or pinenuts or any roasted nut you like. Unroasted peanuts and macademias should work well

Saturday, March 19, 2016

DIY Plant Markers


Icy pole and icecream sticks should always be saved because they are useful.  They can be used to stir a small pot of paint, to mix and apply two part expoxy resin aka Araldite, and with a pencil or waterproof pen/biro...


...they make biodegradable plant markers.


Friday, January 09, 2015

Snail and slug trap Mark III: The Final Design.

I've made a few versions of slug and snail beer traps and here is another one to try.

Take an empty, single serve, lidded yoghurt pot and remove the cardboard outer sheath:
 photo SlugtrapWhole_zps41fe36da.jpg

Remove the lid and cut an aperture in it using a cutting knife or strong scissors/shears. Make the hole big enough to take an adult snail but small enough so that the lid still clips on to keep out most of the rain:
 photo SlugtrapLid_zpsa8accac8.jpg
 photo slugtrapCut_zps6593be4b.jpg

Examples of shapes you can cut into it and some decoration because I can't help myself:
 photo slugtrapV_zps353c88b5.jpg
 photo slugtrapDeco_zpsded2018c.jpg

In situ in my sister's veggie patch, partially buried for stability and access, freshly baited with Carlton Draught
 photo slugtrapBeer_zps389e0d66.jpg

The same idea using a single serve, microwave soup bowl instead.
 photo EscargotInn_zps03a94ccd.jpg
The lid can be a bit trickier to get off and it needs more beer but it works as well as the yoghurt pot version if not better. It's very stable, doesn't blow over in the wind, doesn't need to be buried to capture, evaporation is minimal, it keeps out the rain and water from the hose. One way to improve it would be to cut the hole to the edge like the yoghurt pot for easier lid removal.


Saturday, February 08, 2014

Good eggs and bad eggs - An old fashioned test

So your eggs are close to or past their recommended use by. Or maybe you have your own chooks and you're not sure how old your eggs are. Before you throw them out you can test them to see if they are still good. This is an old trick your grand mother would have used.

 photo egg_zps2f62e27c.jpg
First take your egg. Funny face drawn on is optional (done with a Chinagraph / wax pencil)

Gently place it into a glass of water.
Make sure you choose a glass big enough for the egg to sink to the bottom.
If it sinks, it's a good egg and it's fine to eat.

 photo eggGLASS_zps96e3dec9.jpg
If it floats, it's a bad egg so do not eat it!
It floats because of the gas created as it decomposes.

I usually test a whole carton to see if any need to be disposed of, then retest them as I use them. I break our bad eggs directly into the compost bin.

Saturday, December 14, 2013

Humane Anti Bird Barrier - ground plants and seedlings.

 photo AntiBirdSpikes_zpsd03d6c67.jpg
A free and easy way to protect young plants and seedlings from foraging birds. Blackbirds in particular like to forage through garden beds flicking mulch and dirt about in their search for food. They often dig up young plants in the process!

We have used bamboo twigs neatly placed in 'A' shapes as shown above but a triangular teepee or encircling fence in similar proximity will work as well if not better. You don't have to use bamboo -any stick or twig will do. It needs to be sturdy and long enough so it won't be easily dug up and is close together enough to prevent the bird from getting close to the root system or the plant itself. More rather than less is best for delicate seedlings. As the plant gets older you can pull them out. With found twigs you can be a bit lazier and just leave them there to disintegrate.

A larger version of this system also works well for stopping your dog from continually peeing on a plant.

Saturday, September 21, 2013

Make your own home grown seed packs

 photo SeedPacketTea_zpsdab19c7c.jpg

Cut open and save the individual paper sachets from tea bags. Reuse them as packets for your collected garden seeds.

Monday, August 26, 2013

Homemade white fly sticky trap

 photo FrogYellow_zps124952e9.jpg
Essentially all you need is something yellow, weather resistant and sticky with a decent surface area. The whiteflies are attracted to bright yellow and orange.

We found some plywood frog cutouts at the last hard waste collection as well as some yellow enamel paint. I combined the two with a spike made from some broken garden lattice.Obviously it will still work if its a plain old rectangle but I had the frogs so why not make them ornamental?

I tried painting used motor oil onto them to act as a sticky surface but it wasn't particularly sticky, it ran down it and was a bit dark. Smearing it with an old pot of vaseline based lip balm worked a treat as pictured.

Saturday, July 27, 2013

Slugs and Snails: Make a Beer Baited Slug Trap Mark II

I made this one using an instant noodle container and an Aqua Spike. I used my Dremel to drill a hole for the spike, to hold the roof up. The dremel helped me to add a bit of artistic flair by engraving the roof. It reads: 'The Drunken Slug Inn. Snails welcome.' and the 'S' in slug is a slug :)


 photo SlugInn_zps1481cef5.jpg

Like the Mark I it seems to be most attractive to slugs rather than snails. So how do we deal with snails?

 photo CoffeeGrounds_zps209258d2.jpg

My housemate planted some cyclamens. She would usually scatter snail pellets around new plants like these but it hasn't been necessary. I had read that coffee grounds can be an effective snail deterrent so we've been scattering that closely around these new plants instead. Additionally, the grounds are a good soil conditioner. We would usually broadcast the grounds over the mulch. It feels good to use gentle, organic pest control that won't linger in the foodchain.

Saturday, July 20, 2013

LadyMeerkat's Perfect Pot of Tea

It might seem obvious but if you want to have the perfect cup or two of teapot tea then you don't want to drown the tea leaves in excess water.

Swirl some hot water around the pot to warm it up. Do the same with the cups and the measuring jug if you want to be really thorough, especially if it's Winter!
Measure out however many cups of tea you need by the metric cup (1 cup = 250ml) with a heat proof measuring jug.
Add one heaped teaspoon of tea to the pot for however many cups of tea you want to make, PLUS one for the pot. One cup of tea = 2tsp  Two cups of tea = 3tsp etc
Add water and brew to taste.

cU  \(~)?  cU

 photo teapottea_zpsfac181c8.jpg

Green Thumb Tip:
Scatter the spent tea leaves widely over your garden beds or add to your compost / mulch heap. I like to scoop them out with a tea spoon then rinse out the pot and pour that water in the garden as well.

Friday, February 15, 2013

Protect your fruit from birds and bats

Green Thumb's Tips for the Day:
Protect your fruit crop from birds and bats without harming them and without spending a cent! Save every bit of netting you can from bags of oranges, garlic, onions and other green groceries. Tulle works if you have some scraps of it as we did (found some bright pink tulle at hard waste). Wrap and bag groups of fruit in the netting and secure with clothes pegs. Don't wrap groups too tightly or they may rot from being pressed against each other - they need a bit of air around them. Put over the biggest or most sun exposed fruit first as these will the first to get the critters' attention. For the most part it works. Washing the netting in laundry soap and not rinsing it seems to help a bit too. We stumbled onto that by pulling apart an old cleansing puff for netting.

 photo TIPnetfruit_zps2e776710.jpg

You will lose whatever isn't netted. We couldn't reach it all so that was expected. The animals will take the path of least resistance and eat the unnetted ones first. Late in your crop when there isn't much left they will magically get at what is netted. Those rainbow lorikeets have dextrous mouths! We had some losses but we got more than we could eat before that point. We stewed up most of it, sans sugar, and stored it in the freezer to enjoy for the next few months. It's delightful, warmed with cool, plain yoghurt on top - with an optional light sprinkle of quick oats if you're having it for breakfast.

Listening to: Come Undone by Duran Duran, from Duran Duran (The Wedding Album).

Wednesday, October 10, 2012

Dandelion root coffee tips

Previously my housemate F, and I went to CERES open day back in July where I enjoyed a dandelion latte at the cafe. It has a pleasant earthy, nutty taste. After that it seemed worthwhile to try making my own dandelion coffee.  I dug up about a bucket's worth of weed, trimmed them back using poultry shears and washed them as throughly as I could, chopped, roasted and food processed them into a coffee like powder. The washing part of the process is the most labour intensive.

Among the countless roots we handled there was this little guy who deserved a close up and is the main reason why you get to read this at all. Other tutorials are sufficient, though after writing this I realise they don't give you exactly the same tips about cleaning. What started out as context for a picture post has become a partial instructional piece.

Photobucket


We had a two person working bee* collecting all of the dandelion we could find to make dandelion coffee. We had decided to reseed the 'lawn' so harvesting dandelion was a byproduct of that process. We made several batches of coffee and found it was slightly less onerous doing it between us. However F no longer finds the smell of it appetising and has not drunk any of it as coffee. More on that later.

After about six or so batches within a week this is what I found to be the best way to clean the roots:

  • Agitating the roots in a bucket of water gives limited results. A sieve or mesh and a hose - over a bucket if you want to collect the water - worked a lot better and used less water.
  • Trim away all trace of stalk and greenery using poultry shears. They're good for fine snipping and wet objects.
  • Wash them in the kitchensink, immersing them in a bowl of water - wear rubber gloves because you're going to be there a while. Use a butterknife to gouge out any fiddly cruddy bits.

I popped online to read a few tutorials and slapped it together based on more than one set of instructions. You could say I followed this one, however this one seems to have some goods ideas that I might try if I/we ever do it again. We used a granite mortar and pestle to grind the later batches for a more even grind and less to clean up. The roasted roots caused some slight scratching to the food processor bowl and discolouration so processing before roasting might be worth exploring. Note that 250F is about 121C ie a cool oven. I made the mistake of thinking that the instructions mentioning 250 degrees in more than one instructional were in celsius and over roasted my first batch. The coffee beverage from that was fine but an unappetising grey!

One bucket - about 10 litres - of untrimmed roots yields about a quarter of a cup of coffee grounds at best. I make dandelion coffee by running it through my stove top coffee pot using similar amounts as I would for regular coffee grounds. It's lovely sweetened with honey. Limit yourself to one cup though because although it's caffiene free, like coffee it can still have a diuretic and a laxative effect.

F made a rum infusion and served it at our party on the weekend in a cocktail. She took a quarter of a cup of dandelion root grounds and infused it for about 3 weeks in a 700ml bottle of light rum. She then strained it using muslin. We came up with the idea of serving it with a melon balled scoop of vanilla icecream in a shot sized glass as a sort of affogato. It was delicious and our guests seemed to enjoy it. This infusion cocktail is recommended only for recreational purposes in responsible amounts - other sites mention similar alcohol infusions for medicinal use by the spoonful.

F writes: 'White rum. 4 shots infusion, 3 shots milk, 1 shot honey water. Shake with ice, put little ice-cream balls in 8 glasses, pour over. Honey water = honey:water 1:1'


*Can it still be called that if it's just two of you?

Tuesday, August 16, 2011

Make a Beer Baited Slug Trap, Mark I

Slugs like beer to death and so do snails apparently but only slugs seem to come to my refurbished, Ye Happy Slug Inn (MI). It's very simple. You set up an 'inn' amongst whatever plants they are munching. Slugs go in, guzzle beer, get legless and drown - dying a happier death than they do by pellets I'm sure.

Photobucket

1. Save and wash clean a small cuttable plastic container, in this case a 1L milk bottle which has a nice wide neck.
2. Using a box cutter/stanley knife, cut container into two halves to make a shorter container. Use scissors to tidy up the edges if you wish. Make sure the lower half is tall enough to contain about 1/2 cup liquid. If using a lidded tub, cut a hole about 4cm in diameter/square in the lid to let the slugs in. A lid of some sort helps to keep rain from diluting the mixture and other larger animals from getting at the beer. If using a bottle choose one with a wide neck to waft the beer scent and invite slugs in. A soft drink bottle is too narrow, but some water and energy drink bottles have suitable wide necks.
3. Put about 2 to 3cm of beer in base of container and put on lid. I previously tried Carlton Draught which works but not as well as a Corona and Pure Blonde blend do.
4. Place amongst whatever slugs are eating. If in a garden bed you may wish to partially bury the base to 2-3cm above ground level, for stability and to ensure only slugs climb up into it and no other invertebrates fall in.
5. Check every few days to fish out dead slugs, or more frequently if it has been raining. The beer is fine to keep reusing. You will find that with warmer weather a layer of yeast will form. Although icky, yeast is what attract the slugs so you should leave it. I use an old sieve to strain out the slug carcasses and bury them in shallow graves in garden beds and pots. You could also use an old spoon to fish them out of the beer.

Photobucket
The sign is made of an offcut from the bottle, a toothpick and decorated with a mostly permanent pen (HDPE plastic is hard to write on).


Friday, January 01, 2010

Rant about marine plastic debris

Never mind chaos theory's flapping butterfly: one carelessly disposed of plastic item inland, could end up in the gut of an albatross chick on a remote inland thousands of kilometres away. That object could be one of many plastic fragments and particles that will fill this bird's belly thus starving the animal to death.

Hundreds of seemingly insignificant nurdles are swallowed by other animals such as fish, leaching toxins into their bodies.

What can anyone do about any of this? We can all learn to be responsible. We can tell others about it. We can share articles and images with our friends and family to help them understand no piece of plastic is insignificant. It means life or death for the animal that eats it. That animal could indirectly be us. As the dominant species on this planet we have the capacity and therefore the responsibility for our collective actions.