Sunday, September 03, 2023

DIY Plastic free, reclaimed aluminium can, plant tags


I work in a bush crew. One of the things I’ve noticed is that in conservation areas on significant plants they use metal swing tags/labels. I assume they are aluminium because the are inscribed and very light, with no corrosion.

I’ve come up with a way to make an economical and weather durable tag with things I have at home. 

This is a project for adults NOT kids. 
The cut aluminium can edges are moderately safe to handle without gloves if done carefully*
Avoid touching/handling the cut edges.
This project CAN NOT be completed with a steel can.


DIY Aluminium Plant Labels

You will need:

A clean aluminium can

A can opener that lifts off the top of the can

Scissors

A slightly rounded, smooth  metal point such as a darning needle. Mine is a metal fondant or wax working tool. 

A smooth blunt object to press folded metal such as a metal spoon. Mine is the other end of the aforementioned tool. 


Use can opener to remove top of can


Use scissors to cut straight along the length of the can. 
Make another parallel cut 4-5cm away from the first.
Cut between the two cuts to seperate from can.


Cut off non-flat sections from each end.

You should now have a rectangle of roughly 5x12cm


With the labelled exterior of the can facing you, fold along one long edge, about 4-5mm deep.

Fold the other long side over so that it slightly overlaps by 3-4 mm over the first fold. 


Make each fold crisp by pressing it.
Fold over from the broad fold, one corner.
Make the corner fold crisp.


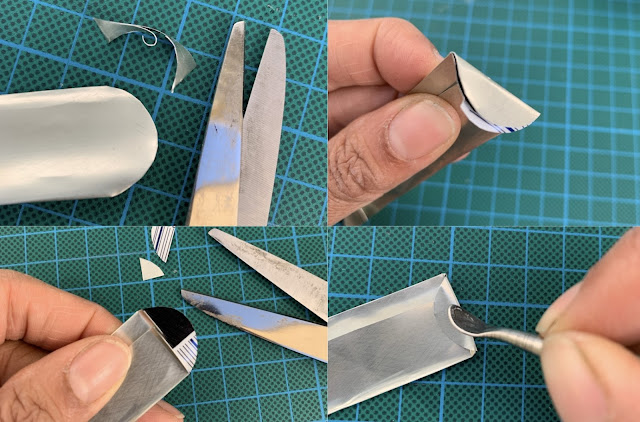
At the other end of the tag, use scissors to cut a semi circle or rounded corners.
Lightly fold over this rounded end towards other folds then fold back.
Snip off folded under layer to leave simple rounded flap.
Fold over rounded flap and press.


Use metal point to carefully write label. You will need to press so keep your lettering small and simple.


Finished!
Gently push into the soil or pot.


Label your plants however is useful to you. As a horticulturalist and revegetation worker, I want to remember the botanical names of the indigenous plants I’m planting. I’m in a rental, so I’m hoping that whoever lives here next will see these tags and respect the indigenous planting.


*While I made two cans worth of labels without cutting myself, others might not be so careful/lucky.  

Sunday, May 28, 2023

Homemade tool to open stuck Bosch washing pump filter cap

Official Bosch Instructions to open filter pump cap.

A common problem with the pump filter on recent Bosch washing machines is if enough or particular object clog it, it can seem impossible to unscrew and clear.

I watched a you tube clip about how to clear it and that seemed doable until I realised there are star headed screws holding the relevant parts together. I’d have to borrow tools to  do it that way. 

I realised the issue is leverage. I happened to have this piece of jarrah (hardwood) decking scrap which has a cut out for manual scroll sawing. It turns out to be exactly the right tool to give gentle leverage without damaging the plastic screw cap. 

Hopefully you can use this image taken on a 1cm grid to create a general template to make one yourself.

I recommend making one to anyone with this machine. Once I figured this out, I fixed my clog (3 bobby pins) very quickly: Quicker than the time it takes to watch either you tube clip or write this post!


Friday, February 22, 2019

A Gay Balloon


Vintage, Richard Scarry ABC Word book

Monday, February 18, 2019

How to: Cut a whole pineapple

You will need a sharp knife with a blade of at least 15cm/6" for safest and best results. 
I have used an IO Shen utility knife.

As a child I observed my (Indian) mum many times cutting up a pineapple, and thus I learnt how. 
This style of pineapple cutting apparently is quite well known in Asia. 
Unlike commercial methods, very little edible material is wasted.
1. Remove top
2. Shave away skin
3. Remove base
4. Make shallow V shaped cuts 
to remove the 'eyes', 2 or 3 at a time.
Keep on cutting around the pineapple. 
The V shaped cuts should mostly connect up into channels all around it.


5. Cut up pineapple into slices.
6. For easy storage, cut slices into quarters, and cut off fibrous core from the corner
7. Most efficient packing suggestion in a square, 1L container.

Teff

Hey kids! Are you tired of breakfast being worth getting up for? Are you sick of hearing about the latest superfood being jacked up in price and availability because all of the hipsters are eating it? 
You need teff porridge!
Guaranteed to taste like last year's cardboard moving box after being soaked for 24 hours in a laundry bucket, even when doused in maple syrup. With a flavour like that it won't be on Instagram or at your local cafe anytime soon. 
TEFF! 
It's good for what ails you.
Probably.
#teff #doyourselfafavour #supergrain #nope

Thursday, October 11, 2018

Street Art: Brunswick, Royal Parade underpass

Brunswick, Royal Parade underpass
October 2018

Sunday, December 31, 2017

How to drain, open and deflesh a coconut.

I learnt how to process a mature coconut via my dad. Use a corkscrew to drill out two of the 'eyes'. Flip over and sit over a glass to drain the water.  Use a wood saw to carefully cut in half. You can create a perimeter or just cut right through. Rinse sawdust off with water. Use a butter/table knife to remove flesh. Start from the cut edge, score the flesh then push the blade flat against the shell and twist. It will pop right off with the edible brown skin. If you don't want that you can shave it off with a knife or peeler. 

Concrete Block Street Art

Western end of Bourke Street Mall, August 2017.

Plumbing the 80s

Or possibly late 1970s
#tapthat
Found in a bag of kids' trading cards at hardwaste earlier in the year.

Sunday, December 17, 2017

How to: decorate indoor pot plants with old bonbon cases

A little brainwave I had today and thought others would appreciate. With the festive day approaching, consider saving used bonbon cases to decorate your small indoor plant pots next year. A home potted up plant decorated with bonbon cases would also make a nice gift 🎁

Peel apart and break apart the case into three sections. You only need two sections to complete a pot wrap 

Use the existing paper tab and slot to join two sections together. Alternatively a little sticky tape can be used.

Cut off the zigzag edges. I've used a stainless steel ruler and cutting knife for the neatest result but scissors are fine if you prefer. 

Check height fit on pot and trim back so cardboard won't get wet when watering your plant.

Tape in position tab side first.
Tape end snugly in place.

All done! 

You can coordinate your pots by using the different designs/colour ways from the same box of bonbons. 

🎄✨Merry Christmas!✨🎄